
1. Import the Selenium library
You can get Selenium from here.
from selenium import webdriver
2. Start the webdriver and the browser
Starting the webdriver and the Chrome browser.
You can get ChromeDriver from here.
chromedriver = "C:/tests/chromedriver.exe"
driver = webdriver.Chrome(executable_path = chromedriver)
Starting the webdriver and the Firefox browser.
You can get GeckoDriver from here.
geckodriver = "C:/tests/geckodriver.exe"
driver = webdriver.Firefox(executable_path = geckodriver)
Starting the webdriver and the Internet Explorer browser.
You can get IEDriverServer from here.
iedriver = "C:/tests/IEDriverServer.exe"
driver = webdriver.Firefox(executable_path = iedriver)
Starting the webdriver and the Safari browser.
Nothing to download. The SafariDriver is integrated in Safari.
driver = webdriver.Safari()
Instead of having machines with all those browsers, I just use Endtest.
It’s a platform for Codeless Automated Testing where you can create, manage and execute tests on real browsers on Windows and macOS machines and mobile devices.
3. Open a website
the_url = "https://example.com"
driver.get(the_url)
4. Find an element
Let’s try to find this element:
<a href="/sign-up" id="register" name="register" class="cta nav-link">Sign Up</a>
Find element by ID
the_id = 'register'
element = driver.find_element_by_id(the_id)
Find element by Name
the_name = 'register'
element = driver.find_element_by_id(the_name)
Find element by Class Name
the_class_name = 'nav-link'
element = driver.find_element_by_class_name(the_class_name)
Find element by Tag Name
the_tag_name = 'a'
element = driver.find_element_by_tag_name(the_tag_name)
Find element by Link Text
Works only for anchor elements.
the_link_text = 'Sign Up'
element = driver.find_element_by_link_text(the_link_text)
Find element by Partial Link Text
Works only for anchor elements.
the_partial_link_text = 'Sign'
element = driver.find_element_by_partial_link_text(the_partial_link_text)
Find element by CSS Selector
You can extract the CSS Selector from the browser.
Or you can write your own by using an attribute from the element:
*[attribute="attribute_value"]
For our element, a custom CSS Selector would be:
a[href="/sign-up"]
the_css_selector = 'a[href="/sign-up"]'
element = driver.find_element_by_css_selector(the_css_selector)
Find element by XPath
You can extract the XPath from the browser.
Or you can write your own by using an attribute from the element:
//*[@attribute = "attribute_value"]
For our element, a custom XPath would be:
//a[@href = "/sign-up"]
You can read more about that here.
the_xpath = '//a[@href = "/sign-up"]'
element = driver.find_element_by_xpath(the_xpath)
5. Click on an element
the_id = 'register'
element = driver.find_element_by_id(the_id)
element.click()
6. Write text inside an element
Works only for inputs and textareas.
the_id = 'email'
the_email = 'klaus@werner.de'
element = driver.find_element_by_id(the_id)
element.send_keys(the_email)
7. Select an option
Works only for select elements.
<select id="country">
<option value="US">United States</option>
<option value="CA">Canada</option>
<option value="MX">Mexico</option>
</select>
Let’s select Canada. 🇨🇦
You can use the visible text:
the_id = 'country'
element = driver.find_element_by_id(the_id)
select_element = Select(element)
select_element.select_by_visible_text('Canada')
You can use the value:
the_id = 'country'
element = driver.find_element_by_id(the_id)
select_element = Select(element)
select_element.select_by_value('CA')
You can also use the index:
the_id = 'country'
element = driver.find_element_by_id(the_id)
select_element = Select(element)
select_element.select_by_index(1)
8. Take a screenshot
the_path = 'C:/tests/screenshots/1.png'
driver.save_screenshot(the_path)
Selenium does not offer Screenshot Comparison but we know who does.
9. Upload a file
This works by using the send_keys method to write the local path of the file in the input type=”file” element.
Let’s use this example:
<input type="file" multiple="" id="upload_button">
the_file_path = 'C:/tests/files/example.pdf'
the_id = 'upload_button'
element = driver.find_element_by_id(the_id)
element.send_keys(the_file_path)
You can read more about uploading files in a test here.
10. Execute JavaScript
In some cases, you might need to execute some JavaScript code.
This works exactly like you would execute it in your browser console.
js_code = 'document.getElementById("pop-up").remove()'
driver = execute_script(js_code)
11. Switch to iframe
<iframe id="payment_section">
   <input id="card_number">
   <input id="card_name">
   <input id="expiration_date">
   <input id="cvv">
</iframe>
the_iframe_id = 'payment_section'
the_element_id = 'card_number'
the_iframe = driver.find_element_by_id(the_iframe_id)
driver.switch_to.frame(the_iframe)
element = driver.find_element_by_id(the_element_id)
element.send_keys('41111111111111')
driver.switch_to.default_content()
Endtest also supports iframes and it even supports Shadow DOM.
12. Switch to the next tab
You have to store the handle of your current tab in a global variable.
If you have only one tab open, the handle is 0.
global nextTab
global currentTab
nextTab = currentTab + 1
driver.switch_to_window(driver.window_handles[nextTab])
currentTab = currentTab + 1
13. Switch to the previous tab
global previousTab
global currentTab
previousTab = currentTab - 1
driver.switch_to_window(driver.window_handles[previousTab])
currentTab = currentTab - 1
14. Close tab
driver.close()
15. Close alert
driver.switch_to.alert.accept()
16. Refresh
driver.refresh()
17. Hover
the_id = "register"
the_element = driver.find_element_by_id(the_id)
hover = ActionChains(driver).move_to_element(the_element)
hover.perform()
18. Right Click
the_id = "register"
the_element = driver.find_element_by_id(the_id)
right_click = ActionChains(driver).context_click(the_element)
right_click.perform()
19. Click with offset
In order to precisely click on a certain position in a canvas element, you have to provide the offset.
The offset represents the number of pixels to the right and down, starting from the top left corner of your canvas element.
the_id = "register"
the_element = driver.find_element_by_id(the_id)
x = 30
y = 20
offset = ActionChains(driver).move_to_element_with_offset(the_element,x,y)
offset.click()
offset.perform()
You can read how to do this with Endtest here.
20. Press Key
the_id = 'register'
element = driver.find_element_by_id(the_id)
element.send_keys(Keys.RETURN)
21. Drag and drop
element_to_drag_id = 'ball'
target_element_id = 'goal'
element_to_drag = driver.find_element_by_id(element_to_drag_id)
target_element = driver.find_element_by_id(target_element_id)
ActionChains(driver).drag_and_drop(element_to_drag_id, target_element).perform()
22. Get Page Source
the_page_source = driver.page_source
23. Get Cookies
cookies_list = driver.get_cookies()
24. Delete Cookies
cookie_item = 'shopping_cart'
# delete one cookie
driver.delete_cookie(cookie_item)
# delete all cookies
driver.delete_all_cookies()
25. Get first element from list
the_id = 'register'
list_of_elements = driver.find_elements_by_id(the_id)
first_element = list_of_elements[0]
26. Configure Page Load Timeout
driver.set_page_load_timeout(20)
27. Configure Element Load Timeout
from selenium.webdriver.support.ui import WebDriverWait

the_id = 'register'
WebDriverWait(driver,10).until(EC.presence_of_element_located((By.ID, the_id)))
28. Set window size
driver.set_window_size(1600, 1200)
29. Change the user agent string
the_user_agent = 'hello'
chromedriver = 'C:/tests/chromedriver.exe'
options = webdriver.ChromeOptions()
options.add_argument('--user-agent = '+ the_user_agent)
driver = webdriver.Chrome(
   executable_path = chromedriver,
   chrome_options = options)
30. Simulate webcam and microphone
chromedriver = 'C:/tests/chromedriver.exe'
options = webdriver.ChromeOptions()
options.add_argument("--use-fake-ui-for-media-stream")
options.add_argument("--use-fake-device-for-media-stream")
driver = webdriver.Chrome(
   executable_path = chromedriver,
   chrome_options = options)
31. Add Chrome Extension
chromedriver = 'C:/tests/chromedriver.exe'
extension_path = 'C:/tests/my_extension.zip'
options = webdriver.ChromeOptions()
options.add_extension(extension_path)
driver = webdriver.Chrome(
   executable_path = chromedriver,
   chrome_options = options)
32. Emulate mobile device
google_pixel_3_xl_user_agent = 'Mozilla/5.0 (Linux; Android 9.0; Pixel 3 XL Build/OPD3.170816.012) AppleWebKit/537.36 (KHTML, like Gecko) Chrome/61.0.3163.98 Mobile Safari/537.36'
pixel_3_xl_emulation = {
   "deviceMetrics": {
      "width": 411,
      "height": 731,
      "pixelRatio": 3
   },
   "userAgent": google_pixel_3_xl_user_agent
}
options = webdriver.ChromeOptions()
options.add_experimental_option("mobileEmulation", pixel_3_xl_emulation)
driver = webdriver.Chrome(
   executable_path = chromedriver,
   chrome_options = options)
Debt to GDP ratio by country
So your job is to scrape the national debt to GDP for each country listed in this website ‘http://worldpopulationreview.com/countries/countries-by-national-debt/‘.

The population is not required to be scraped, however if you want to scrape it that’s fine.
Now since this will be your first exercise, I’m gonna list below the steps you need to follow:
First thing first please scaffold a new project called ‘national_debt‘ and then generate a spider within that same project called “gdp_debt“
The website does use the “http” protocol by default so there is no need to modify that in the ‘start_urls’ since by default Scrapy will use “http“
Next inside the parse method make sure to iterate(loop) through all rows and yield two keys ‘country_name‘ and ‘gdp_debt‘
Finally make sure to execute the spider
A sample of the output:

Please follow the steps to complete your e-attendance
- Click this link
- Get your Student ID
- Class ID: 32103
- User Guide
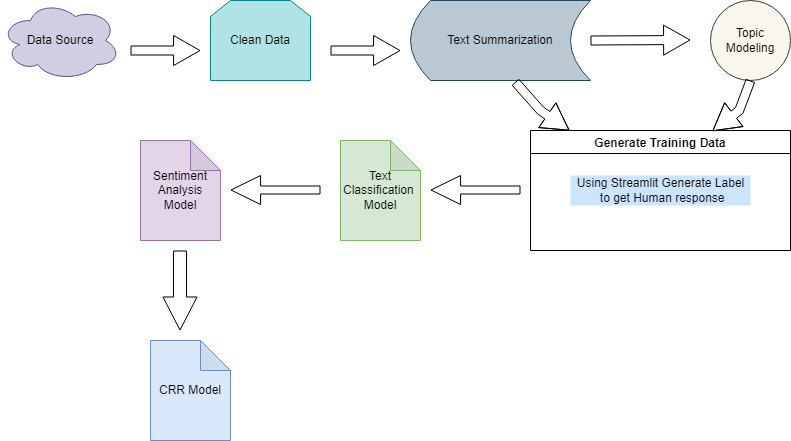
Text Cleaning includes following steps (but not limited to) :
- Lower Casing
- Removal of punctuations
- Removal of stopwords
- Removal of frequent words
- Removal of very rare words
- Stemming
- Lemmatization
- Removal of emojis
- removal of emoticons
- Conversion of emoticons to words
- Conversion of emojis to words
- Use of regular expressions (removal of URL, HTML tags , Phone no, Email id, etc)
- Chat words conversion
- Spelling correction
- Removal of non-english words
Example Notebook
For Topic Modeling we can use
- LDA
- Guided (Seeded) LDA
- Anchored CorEx
Example Notebook
- Text Summarization with Seq2Seq Model
- Text summarization with transformers
- text summarization with Hugging Face transformers
Example Notebook
Example Notebook
Example Notebook
Official Libraries
First-party cool stuff made with love by Hugging Face.
- transformers – State-of-the-art natural language processing for Jax, PyTorch and TensorFlow.
- datasets – The largest hub of ready-to-use NLP datasets for ML models with fast, easy-to-use, and efficient data manipulation tools.
- tokenizers – Fast state-of-the-Art tokenizers optimized for research and production.
- knockknock – Get notified when your training ends with only two additional lines of code.
- accelerate – A simple way to train and use PyTorch models with multi-GPU, TPU, mixed-precision.
- autonlp – Train state-of-the-art natural language processing models and deploy them in a scalable environment automatically.
- nn_pruning – Prune a model while finetuning or training.
- huggingface_hub – Client library to download and publish models and other files on the huggingface.co hub.
- tune – A benchmark for comparing Transformer-based models.
Tutorials
Learn how to use Hugging Face toolkits, step-by-step.
- Official Course (from Hugging Face) – The official course series provided by Hugging Face.
- transformers-tutorials (by @nielsrogge) – Tutorials for applying multiple models on real-world datasets.
NLP Toolkits
NLP toolkits built upon Transformers. Swiss Army!
- AllenNLP (from AI2) – An open-source NLP research library.
- Graph4NLP – Enabling easy use of Graph Neural Networks for NLP.
- Lightning Transformers – Transformers with PyTorch Lightning interface.
- Adapter Transformers – Extension to the Transformers library, integrating adapters into state-of-the-art language models.
- Obsei – A low-code AI workflow automation tool and performs various NLP tasks in the workflow pipeline.
- Trapper (from OBSS) – State-of-the-art NLP through transformer models in a modular design and consistent APIs.
Text Representation
Converting a sentence to a vector.
- Sentence Transformers (from UKPLab) – Widely used encoders computing dense vector representations for sentences, paragraphs, and images.
- WhiteningBERT (from Microsoft) – An easy unsupervised sentence embedding approach with whitening.
- SimCSE (from Princeton) – State-of-the-art sentence embedding with contrastive learning.
- DensePhrases (from Princeton) – Learning dense representations of phrases at scale.
Inference Engines
Highly optimized inference engines implementing Transformers-compatible APIs.
- TurboTransformers (from Tencent) – An inference engine for transformers with fast C++ API.
- FasterTransformer (from Nvidia) – A script and recipe to run the highly optimized transformer-based encoder and decoder component on NVIDIA GPUs.
- lightseq (from ByteDance) – A high performance inference library for sequence processing and generation implemented in CUDA.
- FastSeq (from Microsoft) – Efficient implementation of popular sequence models (e.g., Bart, ProphetNet) for text generation, summarization, translation tasks etc.
Model Scalability
Parallelization models across multiple GPUs.
- Parallelformers (from TUNiB) – A library for model parallel deployment.
- OSLO (from TUNiB) – A library that supports various features to help you train large-scale models.
- Deepspeed (from Microsoft) – Deepspeed-ZeRO – scales any model size with zero to no changes to the model. Integrated with HF Trainer.
- fairscale (from Facebook) – Implements ZeRO protocol as well. Integrated with HF Trainer.
- ColossalAI (from Hpcaitech) – A Unified Deep Learning System for Large-Scale Parallel Training (1D, 2D, 2.5D, 3D and sequence parallelism, and ZeRO protocol).
Model Compression/Acceleration
Compressing or accelerate models for improved inference speed.
- torchdistill – PyTorch-based modular, configuration-driven framework for knowledge distillation.
- TextBrewer (from HFL) – State-of-the-art distillation methods to compress language models.
- BERT-of-Theseus (from Microsoft) – Compressing BERT by progressively replacing the components of the original BERT.
Adversarial Attack
Conducting adversarial attack to test model robustness.
- TextAttack (from UVa) – A Python framework for adversarial attacks, data augmentation, and model training in NLP.
- TextFlint (from Fudan) – A unified multilingual robustness evaluation toolkit for NLP.
- OpenAttack (from THU) – An open-source textual adversarial attack toolkit.
Style Transfer
Transfer the style of text! Now you know why it’s called transformer?
- Styleformer – A neural language style transfer framework to transfer text smoothly between styles.
- ConSERT – A contrastive framework for self-supervised sentence representation transfer.
Sentiment Analysis
Analyzing the sentiment and emotions of human beings.
- conv-emotion – Implementation of different architectures for emotion recognition in conversations.
Grammatical Error Correction
You made a typo! Let me correct it.
- Gramformer – A framework for detecting, highlighting, and correcting grammatical errors on natural language text.
Translation
Translating between different languages.
- dl-translate – A deep learning-based translation library based on HF Transformers.
- EasyNMT (from UKPLab) – Easy-to-use, state-of-the-art translation library and Docker images based on HF Transformers.
Knowledge and Entity
Learning knowledge, mining entities, connecting the world.
- PURE (from Princeton) – Entity and relation extraction from text.
Speech
Speech processing powered by HF libraries. Need for speech!
- s3prl – A self-supervised speech pre-training and representation learning toolkit.
- speechbrain – A PyTorch-based speech toolkit.
Multi-modality
Understanding the world from different modalities.
- ViLT (from Kakao) – A vision-and-language transformer Without convolution or region supervision.
Reinforcement Learning
Combining RL magic with NLP!
- trl – Fine-tune transformers using Proximal Policy Optimization (PPO) to align with human preferences.
Question Answering
Searching for answers? Transformers to the rescue!
- Haystack (from deepset) – End-to-end framework for developing and deploying question-answering systems in the wild.
Recommender Systems
I think this is just right for you!
- Transformers4Rec (from Nvidia) – A flexible and efficient library powered by Transformers for sequential and session-based recommendations.
Evaluation
Evaluating NLP outputs powered by HF datasets!
- Jury (from OBSS) – Easy to use tool for evaluating NLP model outputs, spesifically for NLG (Natural Language Generation), offering various automated text-to-text metrics.
Neural Search
Search, but with the power of neural networks!
- Jina Integration – Jina integration of Hugging Face Accelerated API.
- Weaviate Integration (text2vec) (QA) – Weaviate integration of Hugging Face Transformers.
- ColBERT (from Stanford) – A fast and accurate retrieval model, enabling scalable BERT-based search over large text collections in tens of milliseconds.
Cloud
Cloud makes your life easy!
- Amazon SageMaker – Making it easier than ever to train Hugging Face Transformer models in Amazon SageMaker.
Hardware
The infrastructure enabling the magic to happen.
- Qualcomm – Collaboration on enabling Transformers in Snapdragon.
- Intel – Collaboration with Intel for configuration options.
NOTE: This list of resources are entirely from Hugging Faces Repository, I am just sharing it here as a Wiki. Please visit the repository for more