
The below diagram is a visual explanation of the various components of the JupyterHub platform. In the subsequent sections, we shall see what each component is and how the various components work together to serve multiple users with jupyter notebooks.
Components of JupyterHub
Notebooks
At the core of this platform are the Jupyter Notebooks. These are live documents that contain user code, write-up or documentation and results of code execution in a single document. The contents of the notebook are rendered in the browser directly. They come with a file extension .ipynb. The figure below depicts how a jupyter notebook looks:
Notebook Server
As mentioned above, the notebook servers serve jupyter notebooks as .ipynb files. The browser loads the notebooks and then interacts with the notebook server via sockets. The code in the notebook is executed in the notebook server. These are single user servers by design.
Hub
Hub is the architecture that supports serving of jupyter notebooks to multiple users. In order to support multiple users, the Hub uses several components such as Authenticator, User Database, Spawner.
Authenticator
This component is responsible for authenticating the user via one of the several authentication mechanisms. It supports OAuth, GitHub, Google to name a few of the several available options. This component is responsible for providing an Auth Token after the user is successfully authenticated. This token is used to provide access for the corresponding user.
Refer to JupyterHub documentation for an exhaustive list of options. One of the notable options is using an identity aggregator platform such as Auth0 that supports several other options.
User Database
Internally, Jupyter Hub uses a user database to store the user information to spawn separate user pods for the logged-in user and then serve notebooks contained within the user pods for individual users.
Spawner
A spawner is a worker component that creates individual servers or user pods for each user allowed to access JupyterHub. This mechanism ensures multiple users are served simultaneously. It is to be noted that there is a predefined limitation on the number of simultaneous first time spawn of user pods, which is roughly about 80 simultaneous users. However, this does not impact regular usage of the individual servers after initial user pod creation.
How It All Works Together
The mechanism used by JupyterHub to authenticate multiple users and provide them their own Jupyter Notebook servers is described below.
The user requests access to the Jupyter notebook via the JupyterHub (JH) server.
The JupyterHub then authenticates the user using one of the configured authentication mechanisms such as OAuth. This returns an auth token to the user to access the user pod.
A separate Jupyter Notebook server is created and the user is provided access to it.
The requested notebook in that server is returned to the user in the browser.
User then writes code (or documentation text) in the notebook.
The code is then executed in the notebook server and the response is returned to the user’s browser.Deployment and Scalability
The JupyterHub servers could be deployed in two different approaches:
Deployed on the cloud platforms such as AWS or Google Cloud platform. This uses Docker and Kubernetes clusters in order to scale the servers to support thousands of users.
A lightweight deployment on a single virtual instance to support a small set of users.Scalability
In order to support a few thousand users and more, we use the Kubernetes cluster deployment on Google Cloud platform. Alternatively, this could also have been done on the Amazon AWS platform to support a similar number of users.
This uses a Hub instance and multiple user instances each of which is known as a pod. (Refer to the architecture diagram above). This deployment architecture scales well to support a few thousands of users seamlessly.
To learn more about how to setup your own JupyterHub instance, refer to the Zero to JupyterHub documentation.


Jupyter Notebooks provide a way of creating and sharing documents containing live code, visualisations and descriptive text. Typically these would be run locally on the Python kernel on the user’s machine. However, with JupyterHub, the user accesses the Notebook through a browser but storage and computation takes place on a multi-user server.
Jupyterhub consists of a configurable HTTP proxy and a hub from where Notebooks are spawned. By default the hub spawns Notebooks on the server machine itself, however more advanced options can spawn Notebooks into containers using Docker and/or Kubernetes (out of scope but see here).
Creating the JupyterHub Instance
Here I’ll use a single, free Google Cloud f1 micro-instance running Linux Debian 9 to demonstrate setting up a JupyterHub web application. Users will access the UI via a browser and log in via the underlying server’s PAM authentication. SSL will be set up and Supervisor will be used to manage and maintain the Jupyterhub process.
1. Creating the VM
I created a free Google Cloud f1 micro-instance running Debian 9. Remember to select Allow HTTP traffic and Allow HTTPS traffic (these settings should be considered carefully when moving to a production environment). All other default options were used.
In this example we’ll use the default external IP address to access JupyterHub. This IP changes each time the machine is reset, so a permanent IP address should be assigned in production environments.
2. Installing the configurable proxy
I used NPM package manager to install the configurable HTTP Proxy (a wrapper for node-http-proxy). First I downloaded the latest package manager installation script and ran it:
curl -sL https://deb.nodesource.com/setup_12.x | sudo -E bash -and then installed it:
sudo apt install -y nodejsThen I installed the proxy itself using NPM:
sudo npm install -g configurable-http-proxy3. Installing Jupyter and JuptyterHub
I used Pip to install Python packages so let’s get that first:
curl https://bootstrap.pypa.io/get-pip.py -o get-pip.pyand now install it:
sudo python3 get-pip.pyInstall Jupyter:
sudo pip3 install jupyterLet’s install JupyterHub itself:
sudo pip3 install jupyterhubFinally let’s generate a configuration file for JupyterHub:
jupyterhub --generate-configWe won’t make any changes to this initially.
4. Initial testing without SSL
Now let’s run try running JupyterHub without SSL on port 80. First we’ll need to create an account with a password on the OS to login with:
sudo adduser jupyterhubtestEnter a password and we can leave the name, address etc. fields blank.
Now start JupyterHub:
sudo jupyterhub --no-ssl --port 80With luck this should start JupyterHub and the UI should bee accessible at http://<external_IP>:80 :
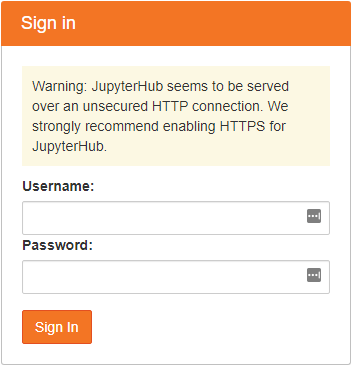
Enter the login details created earlier and a server will be spawned. The view should be familiar if you’ve used Jupyter Notebooks before:
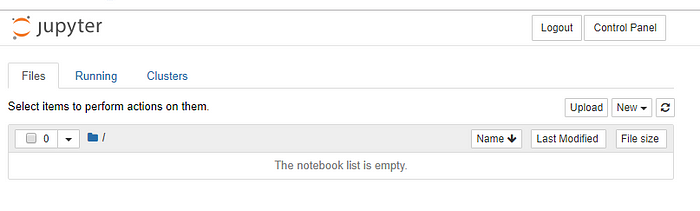
The OS user’s home directory on the server will be shown and any Notebooks and files will be saved there.
N.B. JupyterHub is unsecured at this stage so no important data should be stored on the server.
Now let’s install the next generation web-interface for Project Jupyter, JupyterLab:
sudo pip3 install jupyterlabThe JupyterLab interface should now be accessible at http://<external_IP>/user/jupyterhubtest/lab:

5. Adding SSL
In order to use secure communication rather than plain HTTP, I created a self-signed certificate/key pair using openssl:
openssl req -x509 -newkey rsa:1024 -keyout jhub.key -out jhub.crt -days 365 -nodesNow these files can be referenced when starting JupyterHub and port 443 can be specified:
sudo jupyterhub --ssl-key jhub.key --ssl-cert jhub.crt --port 443Since the certificate is self-signed, the user will get a security warning when loading the page. In production a CA-signed certificated should be used.
Now JupyterHub can be accessed at http://<external_IP>:443 . Communication over port 80 can now be disabled via the Google Cloud Console.
6. Creating an admin user
Admin users are defined in jupyterhub_config.py which we generated earlier. The following line should be added to give the user we created earlier admin access:
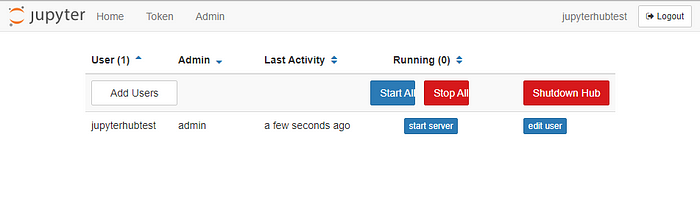
c.JupyterHub.admin_users = set(["jupyterhubtest"])Now, the user can access the admin console where other users’ processes can be stopped and users can be created:
7. Setting up Supervisor
Currently we are just running JupyterHub via the command line: if the process crashes or the server restarts, JupyterHub will no longer be available. The supervisor tool will run and monitor the Jupyter server process and automatically restart it if it crashes, or also if the server is rebooted.
First, let’s install Supervisor:
sudo apt-get install -y supervisorNow we need to create a config file with command to start JupyterHub in /etc/supervisor/conf.jupyterhub.conf with the following contents:
[program:jupyterhub]
command = jupyterhub --ssl-key /path/to/cert/jhub.key --ssl-cert /path/to/cert/jhub.crt --port 443 -f /path/to/config/jupyterhub_config.py
autostart=true
autorestart=true
stopasgroup=true
killasgroup=true
N.B. The full path to the key, certificate and config file are used because the process is run as the root user, so the relative locations used before won’t work.
Reload the Supervisor config:
sudo supervisorctl reloadSupervisor should now start the JupyterHub process automatically. If there are issues then the Supervisor log can be checked in /var/log/supervisor/supervisord.log
8. Sharing data with users
Often, it’s required to automatically share dat with users, e.g. when creating Notebooks for students in a class, the class materials can automatically be available to the students.
To do this, we’ll create a shared folder and configure a symbolic link to it so that each newly created user has the data in their home directory (alternatively, there is also a plugin that uses Git to a similar end: nbgitpuller).
First, we’ll create a shared directory:
sudo mkdir -p /srv/data/my_shared_data_folderNow we’ll create a file in this directory:
sudo touch /srv/data/my_shared_data_folder/sample.txtWe’ll add a symbolic link to the directory in the skeleton directory, so that it’s added to each new user’s home directory when created:
cd /etc/skelsudo ln -s /srv/data/my_shared_data_folder my_shared_data_folder
Now when we create a new user the symbolic link will be created in their home directory the user will see the data in the JupyterHub UI:

We have created a secure JupyterHub instance that can be accessed from anywhere. Supervisor manages the process automatically and when a new user is created, they can automatically access a dataset in their home directory.
Reference
Step
- Install nodejs.
$ curl -sL https://deb.nodesource.com/setup_8.x | sudo -E bash -
$ sudo apt-get install -y nodejs
- Install the package.
# install jupyterhub and nodejs-based http-proxy
$ python3 -m pip install jupyterhub
$ sudo npm install -g configurable-http-proxy
$ python3 -m pip install notebook  # needed if running the notebook servers locally

# verify the installation
$ jupyterhub -h
$ configurable-http-proxy -h
- A notebook configuration file
$ mkdir /home/(user)/.jupyterhub/
$ cd /home/(user)/.jupyterhub/

# generate a configuration file
$ jupyterhub --generate-config

# the default configuration path
$ vim /home/(user)/.jupyterhub/jupyterhub_config.py
- Running a public notebook server
# [optional] Set options for certfile, ip, password, and toggle off browser auto-opening
# if the certfile and keyfile is not set, jupyter notebook would be run over http protocol
c.JupyterHub.ssl_cert = u'/etc/letsencrypt/live/example.com/cert.pem'
c.JupyterHub.ssl_key = u'/etc/letsencrypt/live/example.com/privkey.pem'

## The public facing ip of the whole application (the proxy)
c.JupyterHub.ip = '0.0.0.0'

## The public facing port of the proxy
c.JupyterHub.port = 8000

## File in which to store the cookie secret.
c.JupyterHub.cookie_secret_file = '/home/(user)/.jupyterhub/jupyterhub_cookie_secret'

## url for the database. e.g. `sqlite:///jupyterhub.sqlite`
c.JupyterHub.db_url = 'sqlite:///home/(user)/.jupyterhub/jupyterhub.sqlite'
- Start the jupyterhub server.
$ sudo -s
# jupyterhub -f /home/(user)/.jupyterhub/jupyterhub_config.py
- Establish the service.
# create a new service
$ sudo vim /etc/systemd/system/jupyterhubserver.service
[Unit]
Description=Jupyterhub
After=syslog.target network.target

[Service]
User=root
Environment="PATH=/bin:/usr/local/sbin:/usr/local/bin:/usr/sbin:/usr/bin:/home/(user)/anaconda3/bin"
ExecStart=/home/(user)/anaconda3/bin/jupyterhub -f /home/(user)/.jupyterhub/jupyterhub_config.py

[Install]
WantedBy=multi-user.target
- Start the service.
$ sudo systemctl start jupyterhubserver.service
$ sudo systemctl status jupyterhubserver.service
$ sudo systemctl enable jupyterhubserver.service
- Surf the service.
<!-- surf the link -->
http(s)://example.com:8000/
Server Configuration
- Nginx
$ sudo vim /etc/nginx/sites-available/default
server {
    listen 80;
    server_name example.com;

    charset     utf8;
    access_log    /var/log/nginx/access.log;

    # jupyter portal
    location /jupyter {
        rewrite /jupyter /hub/ redirect;
    }

    # for login
    location /hub/ {
        proxy_pass http://127.0.0.1:8000/hub/;
        proxy_set_header X-Real-IP $remote_addr;
        proxy_set_header Host $http_host;
        proxy_set_header X-Forwarded-For $proxy_add_x_forwarded_for;

        # web socket
        proxy_http_version 1.1;
        proxy_set_header Upgrade $http_upgrade;
        proxy_set_header Connection "Upgrade";
    }

    # for main service
    location /user/ {
        proxy_pass http://127.0.0.1:8000/user/;
        proxy_set_header X-Real-IP $remote_addr;
        proxy_set_header Host $http_host;
        proxy_set_header X-Forwarded-For $proxy_add_x_forwarded_for;

        # web socket
        proxy_http_version 1.1;
        proxy_set_header Upgrade $http_upgrade;
        proxy_set_header Connection "Upgrade";
    }
}
# reload the configuration
$ sudo systemctl reload nginx
Secure the server
- Install Let’s encrypt.
- Install nginx and set the configuration.
server {
    listen 80;
    server_name example.com;

    charset     utf8;
    access_log    /var/log/nginx/access.log;

    # jupyter portal
    location /jupyter {
        proxy_set_header X-Real-IP $remote_addr;
        proxy_set_header X-Forwarded-For $proxy_add_x_forwarded_for;
        return 301 https://$server_name$request_uri;

        # port 80
        #rewrite /jupyter /hub/ redirect;
        # redirect to 443
        return 301 https://$server_name/hub/;
    }

    # for login
    location /hub/ {
        proxy_set_header X-Real-IP $remote_addr;
        proxy_set_header X-Forwarded-For $proxy_add_x_forwarded_for;
        return 301 https://$server_name$request_uri;

        #port 80
        #proxy_pass http://127.0.0.1:8000/hub/;
        # port 443
        return 301 https://$server_name/hub/;
    }

    # for main service
    location /user/ {
        proxy_set_header X-Real-IP $remote_addr;
        proxy_set_header X-Forwarded-For $proxy_add_x_forwarded_for;
        return 301 https://$server_name$request_uri;

        # port 80
        #proxy_pass http://127.0.0.1:8000/user/;
        # port 443
        return 301 https://$server_name/user/;
    }
}

server {
    listen 443;
    server_name example.com;

    charset     utf8;
    access_log    /var/log/nginx/access.log;

    ssl                  on;
    ssl_certificate      /etc/letsencrypt/live/example.com/fullchain.pem;
    ssl_certificate_key  /etc/letsencrypt/live/example.com/privkey.pem;
    ssl_session_timeout  3m;
    ssl_dhparam /etc/ssl/certs/dhparam.pem;
    ssl_stapling on;
    ssl_stapling_verify on;
    ssl_session_cache shared:SSL:50m;
    add_header Strict-Transport-Security max-age=15768000;

    ssl_protocols  SSLv2 SSLv3 TLSv1 TLSv1.1 TLSv1.2;
    ssl_ciphers  'ECDHE-RSA-AES128-GCM-SHA256:ECDHE-ECDSA-AES128-GCM-SHA256:ECDHE-RSA-AES256-GCM-SHA384:ECDHE-ECDSA-AES256-GCM-SHA384:DHE-RSA-AES128-GCM-SHA256:DHE-DSS-AES128-GCM-SHA256:kEDH+AESGCM:ECDHE-RSA-AES128-SHA256:ECDHE-ECDSA-AES128-SHA256:ECDHE-RSA-AES128-SHA:ECDHE-ECDSA-AES128-SHA:ECDHE-RSA-AES256-SHA384:ECDHE-ECDSA-AES256-SHA384:ECDHE-RSA-AES256-SHA:ECDHE-ECDSA-AES256-SHA:DHE-RSA-AES128-SHA256:DHE-RSA-AES128-SHA:DHE-DSS-AES128-SHA256:DHE-RSA-AES256-SHA256:DHE-DSS-AES256-SHA:DHE-RSA-AES256-SHA:AES128-GCM-SHA256:AES256-GCM-SHA384:AES128-SHA256:AES256-SHA256:AES128-SHA:AES256-SHA:AES:CAMELLIA:DES-CBC3-SHA:!aNULL:!eNULL:!EXPORT:!DES:!RC4:!MD5:!PSK:!aECDH:!EDH-DSS-DES-CBC3-SHA:!EDH-RSA-DES-CBC3-SHA:!KRB5-DES-CBC3-SHA';
    ssl_prefer_server_ciphers   on;

    # jupyter portal
    location /jupyter {
        rewrite /jupyter /hub/ redirect;
    }

    # for login
    location /hub/ {
        proxy_pass http://127.0.0.1:8000/hub/;
        proxy_set_header X-Real-IP $remote_addr;
        proxy_set_header Host $http_host;
        proxy_set_header X-Forwarded-For $proxy_add_x_forwarded_for;

        # web socket
        proxy_http_version 1.1;
        proxy_set_header Upgrade $http_upgrade;
        proxy_set_header Connection "Upgrade";
    }

    # for main service
    location /user/ {
        proxy_pass http://127.0.0.1:8000/user/;
        proxy_set_header X-Real-IP $remote_addr;
        proxy_set_header Host $http_host;
        proxy_set_header X-Forwarded-For $proxy_add_x_forwarded_for;

        # web socket
        proxy_http_version 1.1;
        proxy_set_header Upgrade $http_upgrade;
        proxy_set_header Connection "Upgrade";
    }
}