The Hadoop framework is written in Java, and its services require a compatible Java Runtime Environment (JRE) and Java Development Kit (JDK). Use the following command to update your system before initiating a new installation:
sudo apt update
At the moment, Apache Hadoop 3.x fully supports Java 8. The OpenJDK 8 package in Ubuntu contains both the runtime environment and development kit.
Type the following command in your terminal to install OpenJDK 8:
sudo apt install openjdk-8-jdk -y
The OpenJDK or Oracle Java version can affect how elements of a Hadoop ecosystem interact.
Once the installation process is complete, verify the current version:
java -version; javac -version
The output informs you which Java edition is in use.
Set Up a Non-Root User for Hadoop Environment
It is advisable to create a non-root user, specifically for the Hadoop environment. A distinct user improves security and helps you manage your cluster more efficiently. To ensure the smooth functioning of Hadoop services, the user should have the ability to establish a passwordless SSH connection with the localhost.
Install OpenSSH on Ubuntu
Install the OpenSSH server and client using the following command:
sudo apt install openssh-server openssh-client -y
In the example below, the output confirms that the latest version is already installed.
If you have installed OpenSSH for the first time, use this opportunity to implement these vital SSH security recommendations.
Create Hadoop User
Utilize the adduser command to create a new Hadoop user:
sudo adduser hdoop
The username, in this example, is hdoop. You are free the use any username and password you see fit. Switch to the newly created user and enter the corresponding password:
su - hdoop
The user now needs to be able to SSH to the localhost without being prompted for a password.
The system proceeds to generate and save the SSH key pair.
Use the cat command to store the public key as authorized_keys in the ssh directory:
cat ~/.ssh/id_rsa.pub >> ~/.ssh/authorized_keys
Set the permissions for your user with the chmod command:
chmod 0600 ~/.ssh/authorized_keys
The new user is now able to SSH without needing to enter a password every time. Verify everything is set up correctly by using the hdoop user to SSH to localhost:
ssh localhost
After an initial prompt, the Hadoop user is now able to establish an SSH connection to the localhost seamlessly.
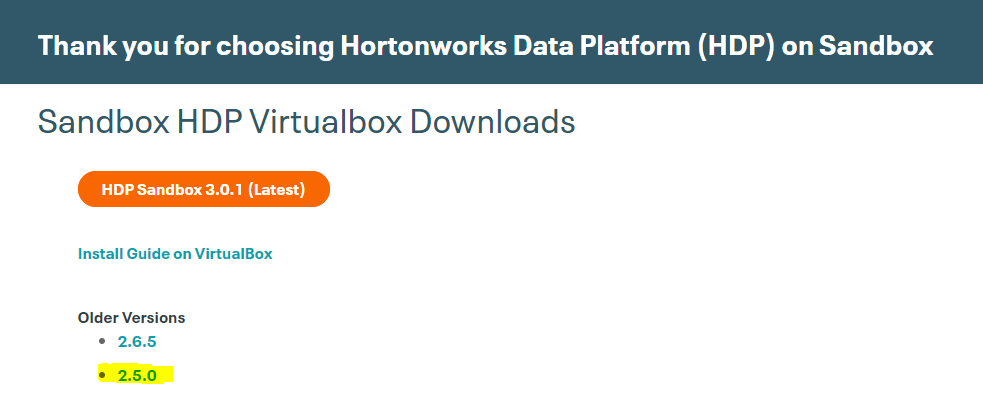
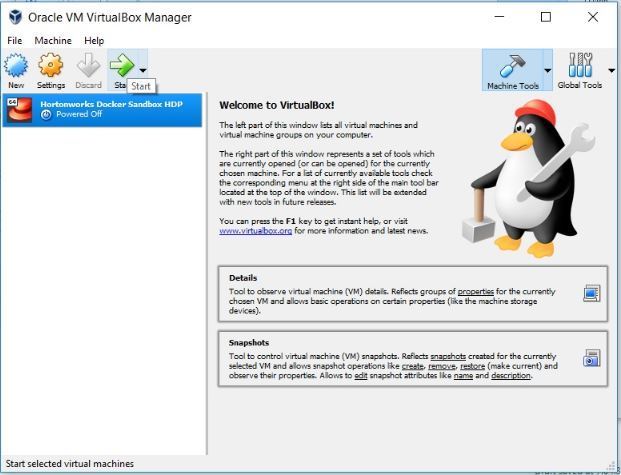
The steps outlined in this tutorial use the Binary download for Hadoop Version 3.2.1.
Select your preferred option, and you are presented with a mirror link that allows you to download the Hadoop tar package.
Note: It is sound practice to verify Hadoop downloads originating from mirror sites. The instructions for using GPG or SHA-512 for verification are provided on the official download page.
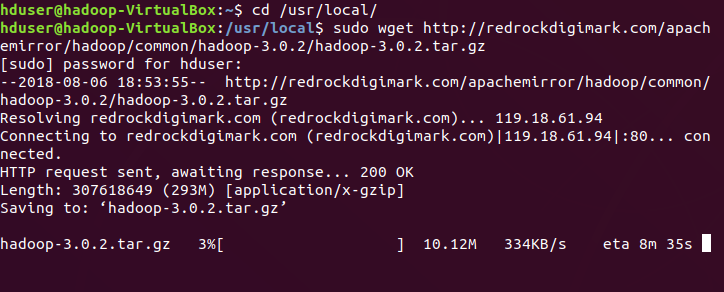
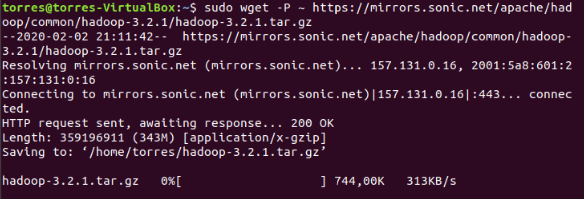
Use the provided mirror link and download the Hadoop package with the wget command:
Once the download is complete, extract the files to initiate the Hadoop installation:
tar xzf hadoop-3.2.1.tar.gz
The Hadoop binary files are now located within the hadoop-3.2.1 directory.
Single Node Hadoop Deployment (Pseudo-Distributed Mode)
Hadoop excels when deployed in a fully distributed mode on a large cluster of networked servers. However, if you are new to Hadoop and want to explore basic commands or test applications, you can configure Hadoop on a single node.
This setup, also called pseudo-distributed mode, allows each Hadoop daemon to run as a single Java process. A Hadoop environment is configured by editing a set of configuration files:
bashrc
hadoop-env.sh
core-site.xml
hdfs-site.xml
mapred-site-xml
yarn-site.xml
Configure Hadoop Environment Variables (bashrc)
Edit the .bashrc shell configuration file using a text editor of your choice (we will be using nano):
sudo nano .bashrc
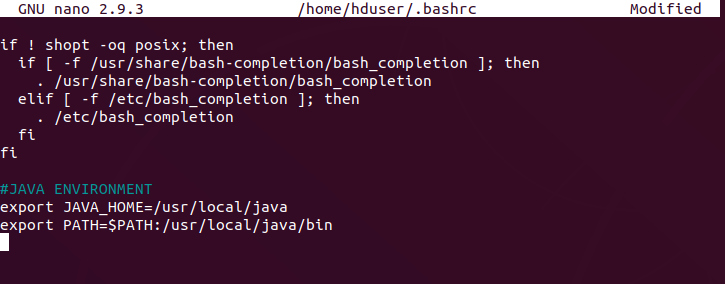
Define the Hadoop environment variables by adding the following content to the end of the file:
Once you add the variables, save and exit the .bashrc file.
It is vital to apply the changes to the current running environment by using the following command:
source ~/.bashrc
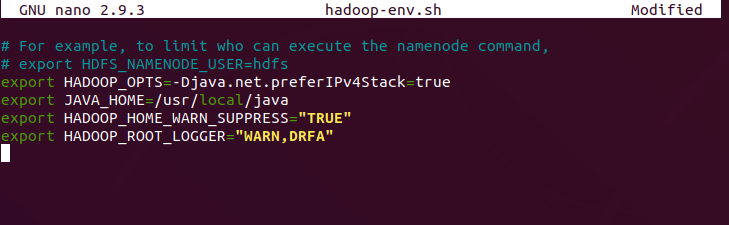
Edit hadoop-env.sh File
The hadoop-env.sh file serves as a master file to configure YARN, HDFS, MapReduce, and Hadoop-related project settings.
When setting up a single node Hadoop cluster, you need to define which Java implementation is to be utilized. Use the previously created $HADOOP_HOME variable to access the hadoop-env.sh file:
sudo nano $HADOOP_HOME/etc/hadoop/hadoop-env.sh
Uncomment the $JAVA_HOME variable (i.e., remove the #sign) and add the full path to the OpenJDK installation on your system. If you have installed the same version as presented in the first part of this tutorial, add the following line:
The path needs to match the location of the Java installation on your system.
If you need help to locate the correct Java path, run the following command in your terminal window:
which javac
The resulting output provides the path to the Java binary directory.
Use the provided path to find the OpenJDK directory with the following command:
readlink -f /usr/bin/javac
The section of the path just before the /bin/javac directory needs to be assigned to the $JAVA_HOME variable.
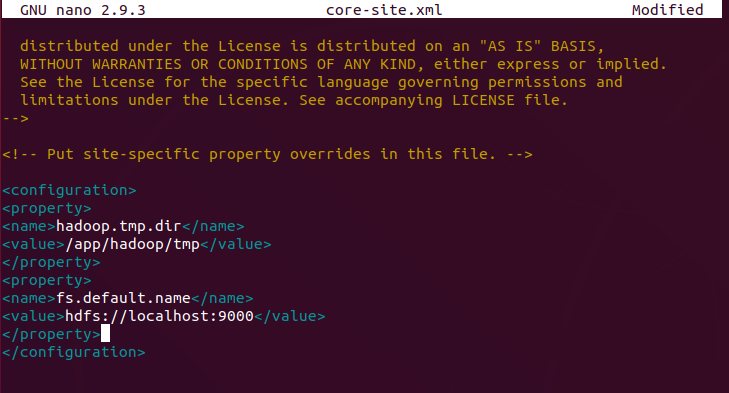
Edit core-site.xml File
The core-site.xml file defines HDFS and Hadoop core properties.
To set up Hadoop in a pseudo-distributed mode, you need to specify the URL for your NameNode, and the temporary directory Hadoop uses for the map and reduce process.
Open the core-site.xml file in a text editor:
sudo nano $HADOOP_HOME/etc/hadoop/core-site.xml
Add the following configuration to override the default values for the temporary directory and add your HDFS URL to replace the default local file system setting:
This example uses values specific to the local system. You should use values that match your systems requirements. The data needs to be consistent throughout the configuration process.
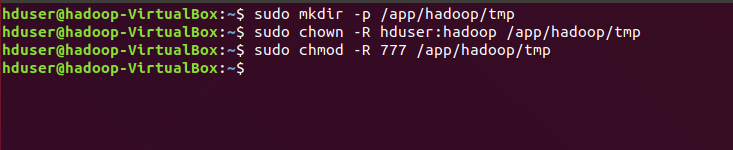
Do not forget to create a Linux directory in the location you specified for your temporary data.
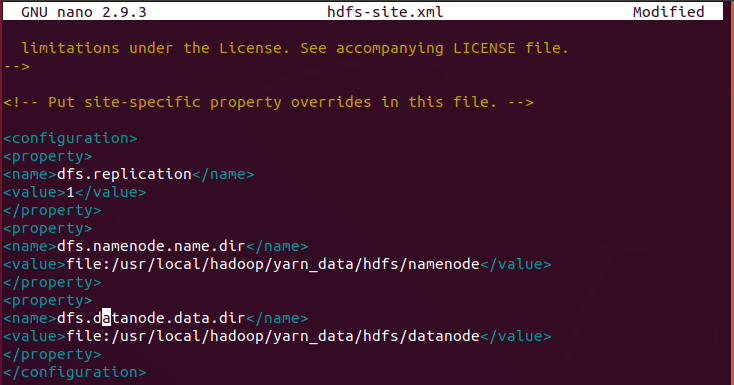
Edit hdfs-site.xml File
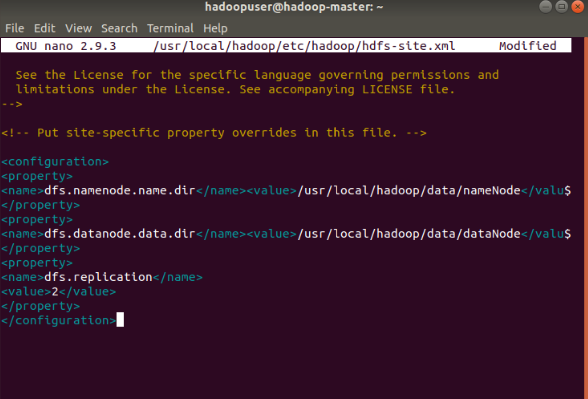
The properties in the hdfs-site.xml file govern the location for storing node metadata, fsimage file, and edit log file. Configure the file by defining the NameNode and DataNode storage directories.
Additionally, the default dfs.replication value of 3 needs to be changed to 1 to match the single node setup.
Use the following command to open the hdfs-site.xml file for editing:
sudo nano $HADOOP_HOME/etc/hadoop/hdfs-site.xml
Add the following configuration to the file and, if needed, adjust the NameNode and DataNode directories to your custom locations:
If necessary, create the specific directories you defined for the dfs.data.dir value.
Edit mapred-site.xml File
Use the following command to access the mapred-site.xml file and define MapReduce values:
sudo nano $HADOOP_HOME/etc/hadoop/mapred-site.xml
Add the following configuration to change the default MapReduce framework name value to yarn:
  mapreduce.framework.name
  yarn
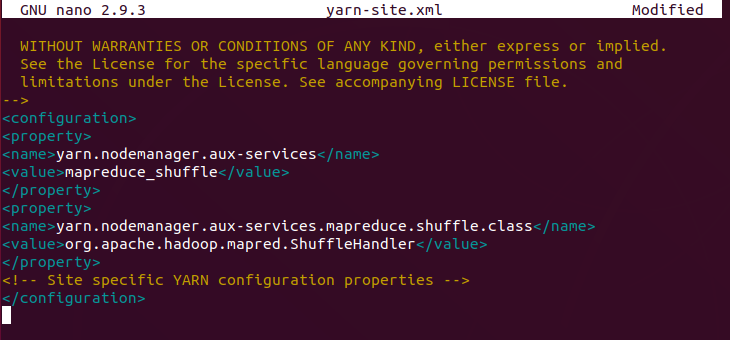
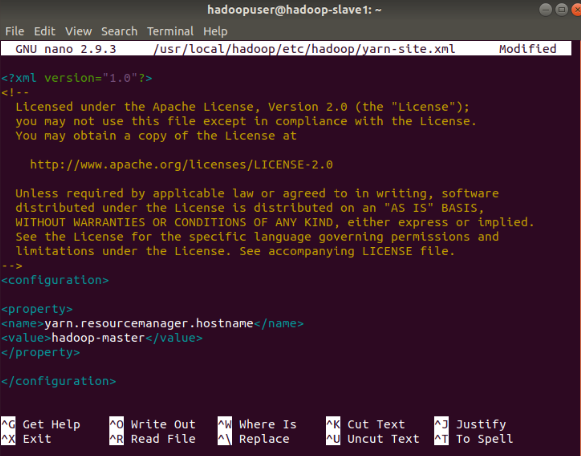
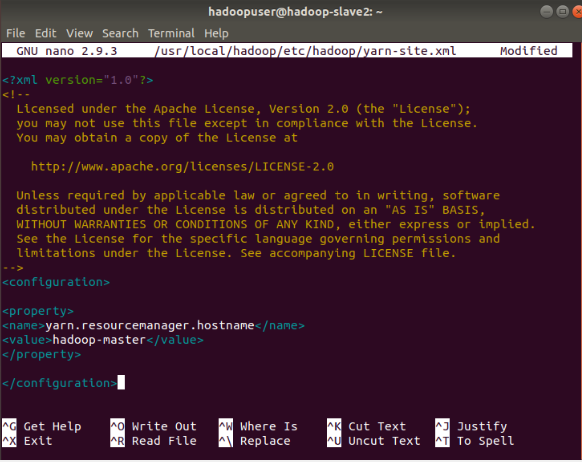
Edit yarn-site.xml File
The yarn-site.xml file is used to define settings relevant to YARN. It contains configurations for the Node Manager, Resource Manager, Containers, and Application Master.
It is important to format the NameNode before starting Hadoop services for the first time:
hdfs namenode -format
The shutdown notification signifies the end of the NameNode format process.
Start Hadoop Cluster
Navigate to the hadoop-3.2.1/sbin directory and execute the following commands to start the NameNode and DataNode:
./start-dfs.sh
The system takes a few moments to initiate the necessary nodes.
Once the namenode, datanodes, and secondary namenode are up and running, start the YARN resource and nodemanagers by typing:
./start-yarn.sh
As with the previous command, the output informs you that the processes are starting.
Type this simple command to check if all the daemons are active and running as Java processes:
jps
If everything is working as intended, the resulting list of running Java processes contains all the HDFS and YARN daemons.
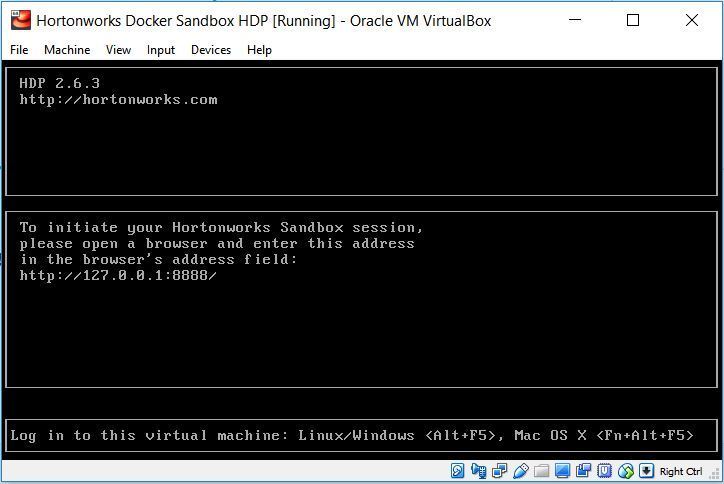
Access Hadoop UI from Browser
Use your preferred browser and navigate to your localhost URL or IP. The default port number 9870 gives you access to the Hadoop NameNode UI:
http://localhost:9870
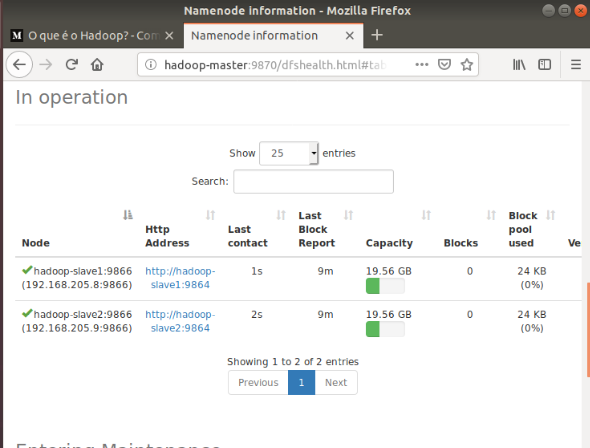
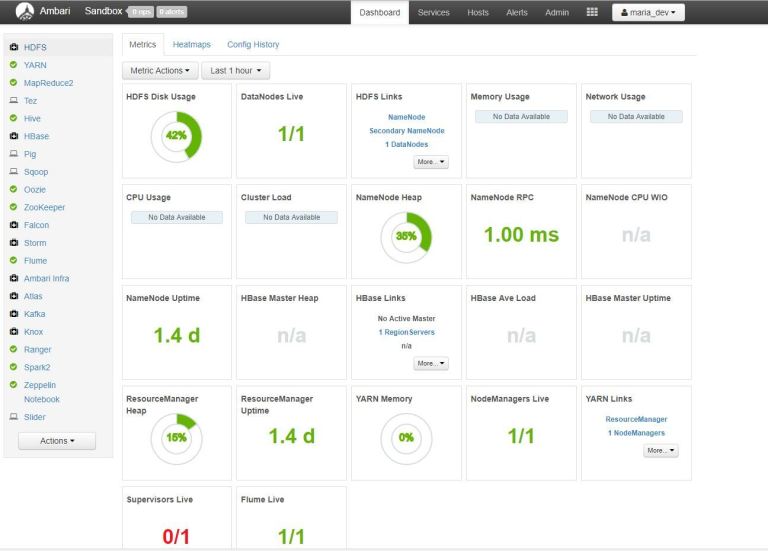
The NameNode user interface provides a comprehensive overview of the entire cluster.
The default port 9864 is used to access individual DataNodes directly from your browser:
http://localhost:9864
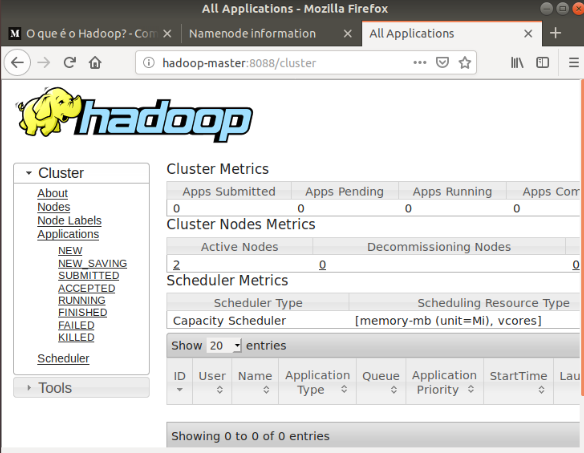
The YARN Resource Manager is accessible on port 8088:
http://localhost:8088
The Resource Manager is an invaluable tool that allows you to monitor all running processes in your Hadoop cluster.
Conclusion
You have successfully installed Hadoop on Ubuntu and deployed it in a pseudo-distributed mode. A single node Hadoop deployment is an excellent starting point to explore basic HDFS commands and acquire the experience you need to design a fully distributed Hadoop cluster.
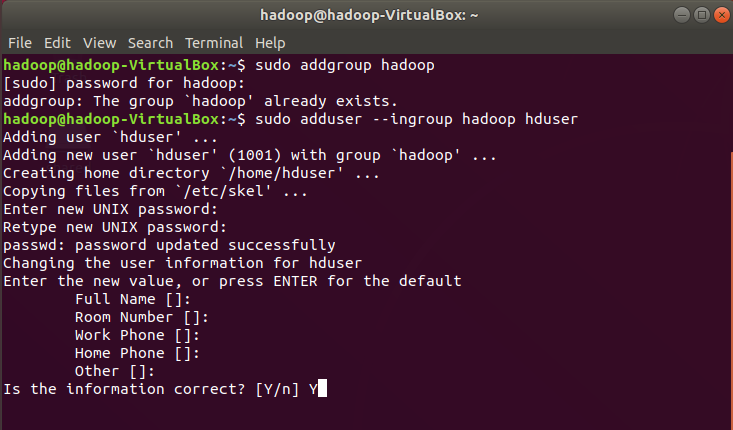
We begin with adding a new user , open a new terminal (Ctrl+Alt+T) & type the following commands. Firstly, create a group hadoop and add a new user hduser within the same hadoop group. sudo addgroup hadoop sudo adduser — ingroup hadoop hduser
To add a new user ‘hduser’ only provide the new password rest all skip just by pressing enter
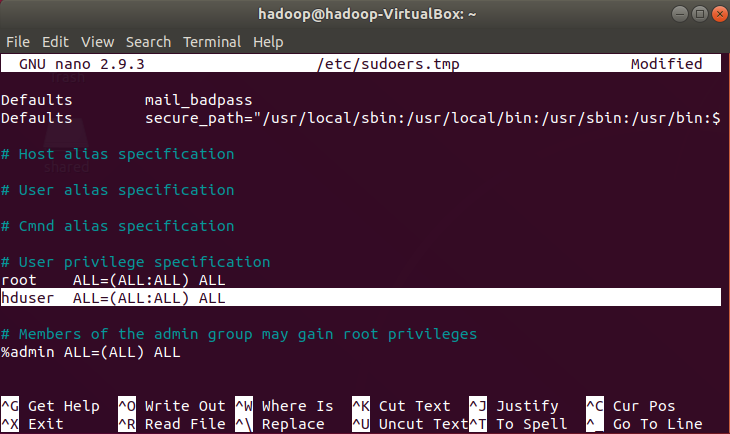
The newly created user will require necessary root permissions for custom files installation. To do so we have to open the sudoers file (sudo visudo) and provide created user hduser root user privilegesby updating the file like below
sudo visudo hduser ALL=(ALL:ALL) ALL
Add the highlighted line in the sudoers file to give root permissions to hduser
Note: To exit from ‘nano’ editor window (Ctrl+X) to save changes press Y press enter to exit back to working terminal.
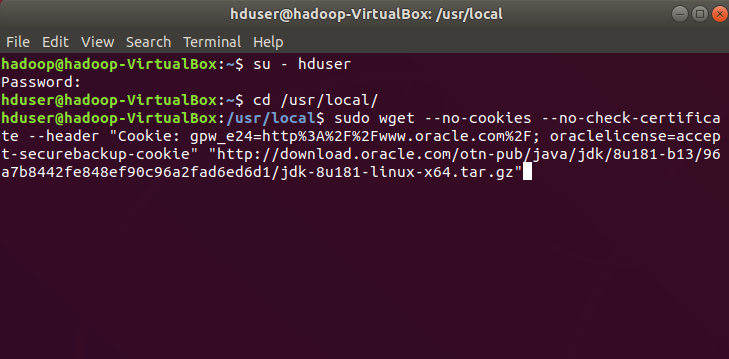
So, Now our new user is ready lets switch to hduser for installing hadoop framework environment.
su – hduser
Java Environment ..
Surprise! Before we install hadoop we have understand a quick simple concept: Hadoop framework requires java environment for running all its services on separate Java Virtual Machine (true only for pseudo distributed mode). Download JDK 8 or above, with java 7 attaining end of life in 2015, Hadoop 3.x revised the min. run time version to Java 8 or above.
Make sure the user changed from root user to hduser (su – hduser). Specify a preferreddirectory for storing all files for hadoop I always prefer /usr/local.
switch user to hduser and download jdk in /usr/local
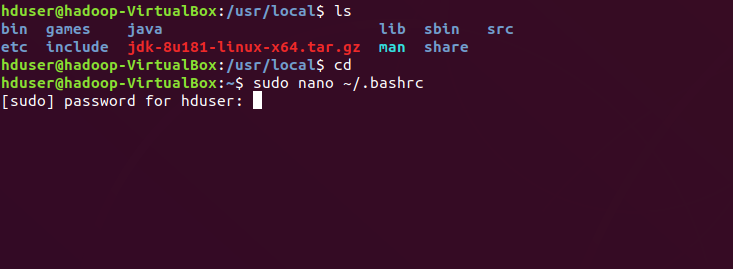
Extract the downloadedjdk file jdk-8u181-linux-x64.tar.gz in same preferred location /usr/local. Rename the extracted file from jdk1.8.0_181 to java.
sudo tar xvzf jdk-8u181-linux-x64.tar.gz sudo mv jdk1.8.0_181 java
Now we have an extracted java file in /usr/local. But ubuntu 18.04 is unaware of the java environment. Lets set the java environment in .bashrc fileor .profile file (for future stories I will prefer bashrc).
Doing so is compulsory, first change the working directory from /usr/local to home directory, open the .bashrc file and add following.
(check if java file is present or not!) ls cd ~ sudo nano ~/.bashrc
Set up java environment in .bashrc file by setting up java_home location and java bin path directory.
Note : Whenever you update .bashrc file it apply changes in ubuntu environment either by rebooting the system or the better option applying source ~/.bashrc
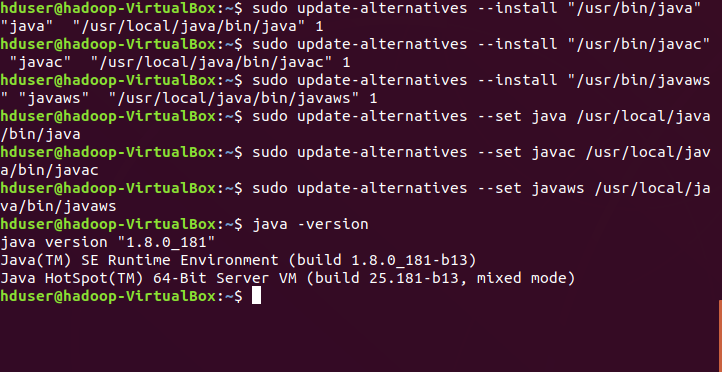
Setting Oracle JDK as the default JVM…
In our case, the java executable is located under /usr/local/java . To set the JVM environment location in your machine run following commands.Let us update the environment with the setting the java (java executable), javac (java compiler), javaws (java web start).
Verify java environment manual installation is completed in the ubuntu system.
java -version
If you have completed till here, Congratulations !! You have just learned how to do manual installation oracle jdk8 on linux environment…
Setting Up Hduser with SSH Keys & Enable Localhost
Hadoop services like Resource Manager & Node Manager uses ssh to share the status of nodes like job scheduling, running status of job, status of DataNodes (alive or not) with all services that running on localhost on separate jvm they exchanges messages b/w slave to master & master to master via. ssh.
SSH(Secure Protocol) is used as the primary means of connecting to Linux servers remotely. In this case ssh localhost is about doing secure ssh to host i.e. localhost.
Try starting your localhost using command: ssh localhost. Doing so initially may throw connection refused error message… ssh: connect to host localhost port 22: Connection refused
Note: If it doesn’t throw any error & succeeds in doing ssh to localhost you can skip these steps & jump to Hadoop Installation.
To handle connection refused error Follow the commands step by step …Remove older version SSH: sudo apt-get remove openssh-server openssh-client
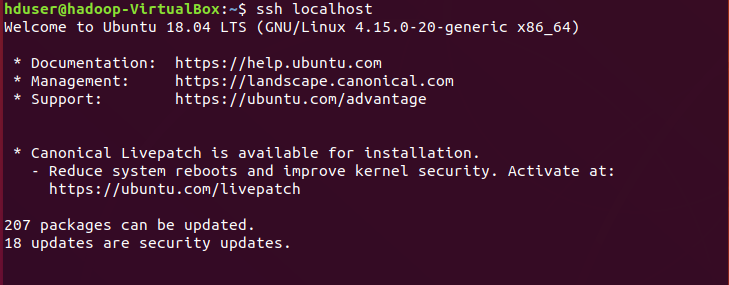
Try ssh localhost again if it asks for password-login as shown below follow the next… Otherwise jump to hadoop installation.
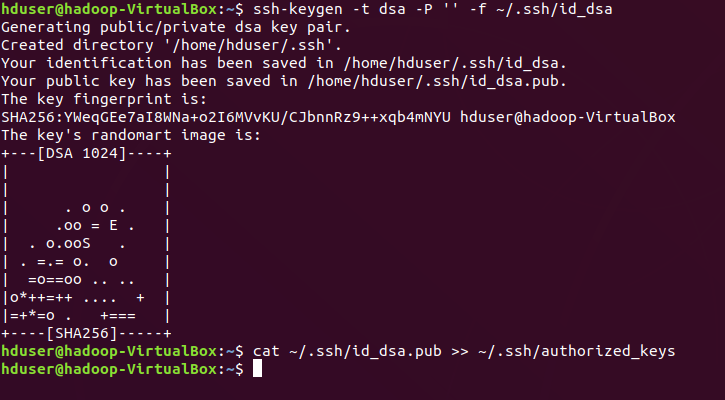
Generate the ssh key again, store key in ~/.ssh/id_rsa.pub. Now,copy the keys to ~/.ssh/authorized_keys using cat command & change permissions of authorized_keys.
SSH to localhost is now secured & remotely accessible without password login requirement. Now our prerequisites to hadoop installation been completed successfully. Note: Don’t forget to exit from localhost before proceeding to next.
Hadoop 3.x Installation Step By Step
Now, lets proceed towards major step of hadoop installation with downloading the latest stable release of hadoop 3.0.2. First get back to location /usr/local & download the stable release[When I publishing this hadoop3.0.2 is the stable version].
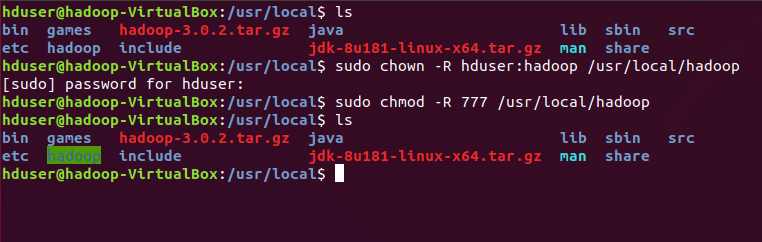
Extract the the hadoop file in same location and rename the extracted folder hadoop-3.0.2 to hadoop (just like we did for java).
sudo tar xvzf hadoop-3.0.2.tar.gz sudo mv hadoop-3.0.2 hadoop
Now we has a folder hadoop framework installed in ubuntu in an embryonic stage.
Setting Up Hadoop 3.x in Pseudo Distributed Mode
Hadoop Framework supports three working modes : Standalone Mode, Pesudo-Distributed Mode, Fully-Distributed Mode. Where, standalone runs all its services in single machine & single JVM, pseudo-distributed mode runs all in one system but on separate JVMs (Best suitable for learning hadoop). Where enterprises set up hadoop in Fully-Distributed Mode each master & slave services running in separate systems & different JVMs. In this story I will be covering pseudo distributed mode.
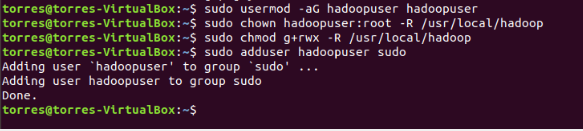
First, provide the ownership of hadoop to ‘user’ hduser [“ This will give ownership only to hduser for running hadoop services ”] using chmod & change the mode of hadoop folder to read, write & execute modes of working.
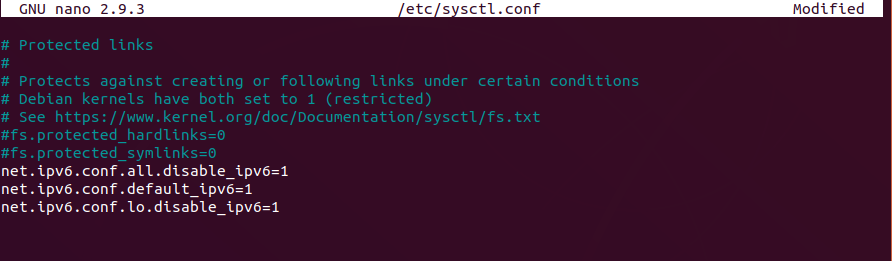
Hadoop & IPV6 does not agrees on the meaning of address 0.0.0.0 so we need to disable IPV6 editing the file… sudo nano /etc/sysctl.conf with… net.ipv6.conf.all.disable_ipv6=1 net.ipv6.conf.default_ipv6=1 net.ipv6.conf.lo.disable_ipv6=1
For confirming if IPV6 is disable or not! execute the command. cat /proc/sys/net/ipv6/conf/all/disable_ipv6
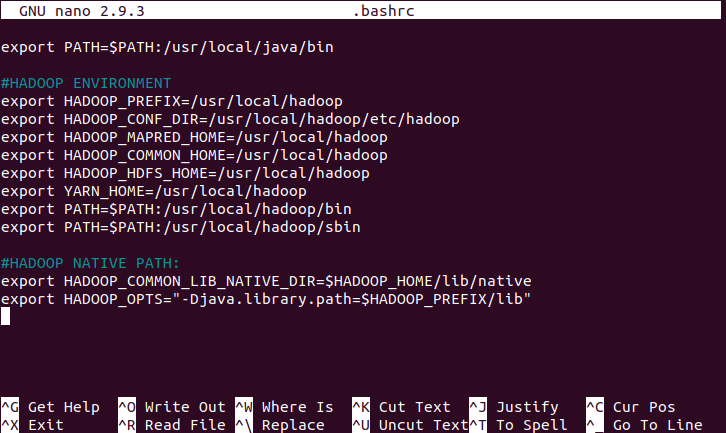
Setting Hadoop Environment
Apply changes in .bashrc file for setting the necessary hadoop environment. Setting changes with hadoop path. Locations of sbin[ “It stores hadoop’s necessary command location” ] & bin directory path are essential otherwise as user you have to always change location to hadoop’s sbin or bin to run required commands.
After completing native directory path setting & configuring. Proceed the next step to hadoop configuration file setting …
Setting up Hadoop Configurations …
Lets change the working directory to hadoop configurations location cd /usr/local/hadoop/etc/hadoop/
1. hadoop-env.sh Open hadoop-env file & change the configurations…
sudo nano hadoop-env.sh
In Hadoop, by default logging level will be determined by logging configuration variable HADOOP_ROOT_LOGGER in hadoop-env.sh file. Set new configurations in hadoop environment file…
What are we going to install in order to create the Hadoop Multi-Node Cluster?
Java 8;
SSH;
PDSH;
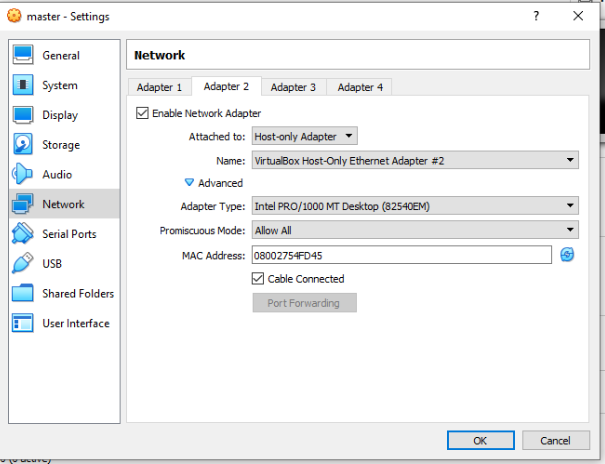
1st Step: Configuring our Network
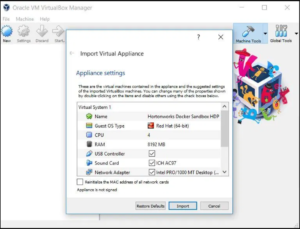
Go to the Network Settings of your Virtual Machine and Enable Adapter 2. Then, instead of NAT, chose Virtual Host-Only Adapter and where it says “Promiscuous Mode” select the option “Allow All”.
2nd Step:
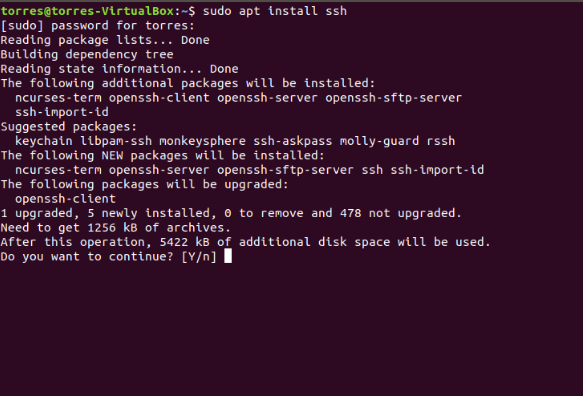
Install SSH using the following command:
sudo apt install ssh
It will ask you for the password. When it asks for confirmation, just give it.
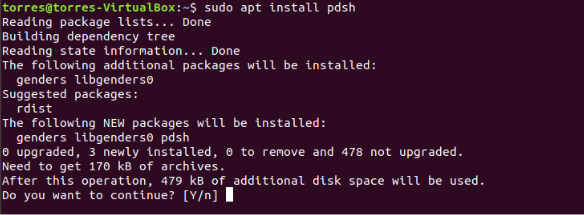
3rd Step:
Install PDSH using the following command:
sudo apt install pdsh
Just as before, give confirmation when needed.
4th Step:
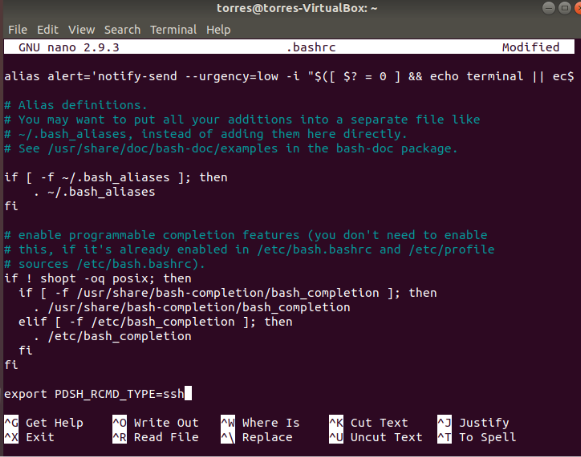
Open the .bashrc file with the following command:
nano .bashrc
At the end of the file just write the following line:
export PDSH_RCMD_TYPE=ssh
5th Step:
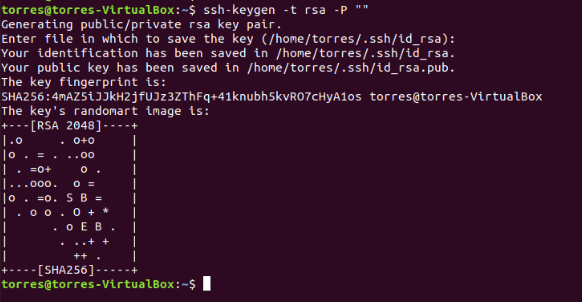
Now let’s configure SSH. Let’s create a new key using the following command:
ssh-keygen -t rsa -P ""
Just press Enter everytime that is needed.
6th Step:
Now we need to copy the public key to the authorized_keys file with the following command:
cat ~/.ssh/id_rsa.pub >> ~/.ssh/authorized_keys
7th Step:
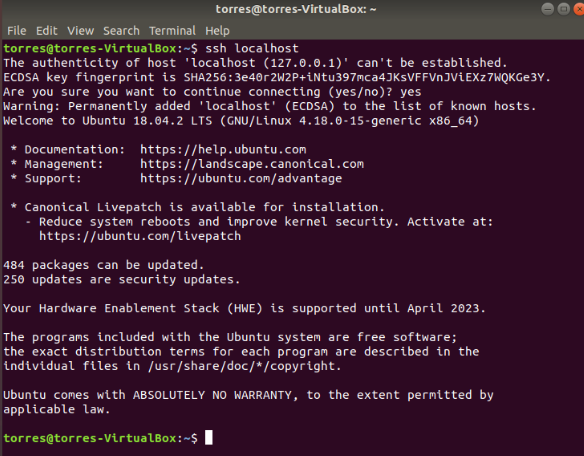
Now we can verify the SSH configuration by connecting to the localhost:
ssh localhost
Just type “yes” and press Enter when needed.
8th Step:
This is the step where we install Java 8. We use this command:
sudo apt install openjdk-8-jdk
Just as previously, give confirmation when needed.
9th Step:
This step isn’t really a step, it’s just to check if Java is now correctly installed:
(I forgot to take a screenshot for this step, but it’s really easy to find. Once you find it just remove the # commentary tag and do what I said, copy it).
14th Step:
Change the hadoop folder directory to /usr/local/hadoop. This is the command:
sudo mv hadoop /usr/local/hadoop
Provide the password when needed.
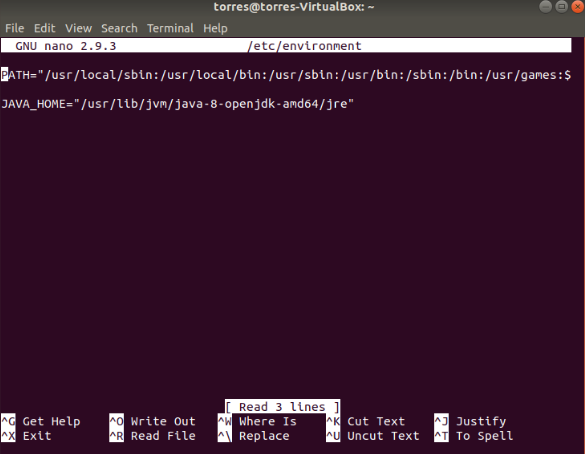
15th Step:
Open the environment file on nano with this command:
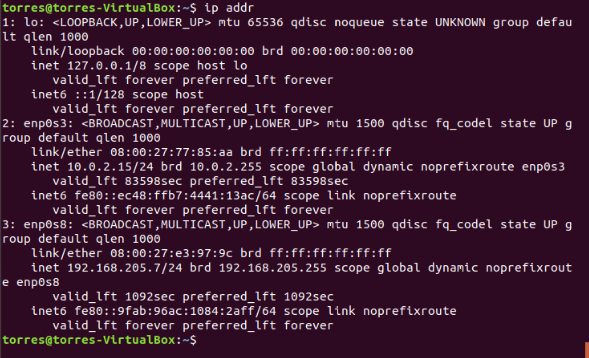
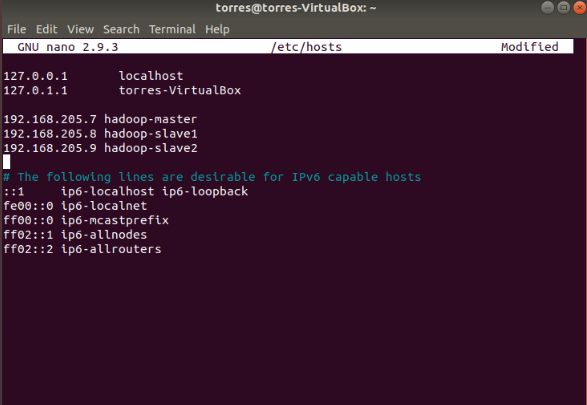
Now, as you can see, my IP is 192.168.205.7, just remember this will be different for you, you need to act accordingly when the IP addresses are used later.
My network will be as follows:
master: 192.168.205.7
slave1: 192.168.205.8
slave2: 192.168.205.9
In your case, just keep adding 1 to the last number of the IP you get on your machine, just as I did for mine.
18th Step:
Open the hosts file and insert your Network configurations:
sudo nano /etc/hosts
19th Step:
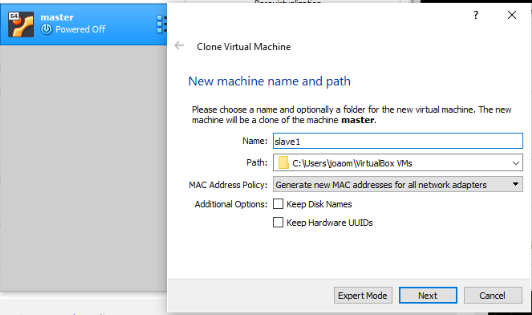
Now is the time to create the Slaves.
Shut Down your Master Virtual Machine and clone it twice, naming one Slave1 and the Other Slave2.
Make sure the “Generate new MAC addresses for all network adapters” option is chosen.
Also, make a Full Clone.
Clone for Slave1, do the same for Slave2.
20th Step:
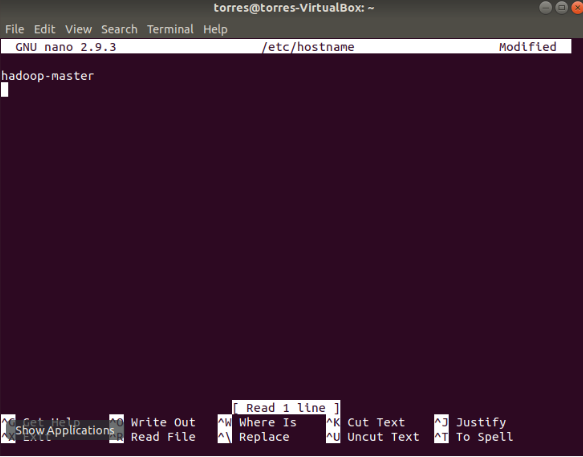
On the master VM, open the hostname file onnano:
sudo nano /etc/hostname
Insert the name of your master virtual machine. (note, it’s the same name you entered previously on the hosts file)
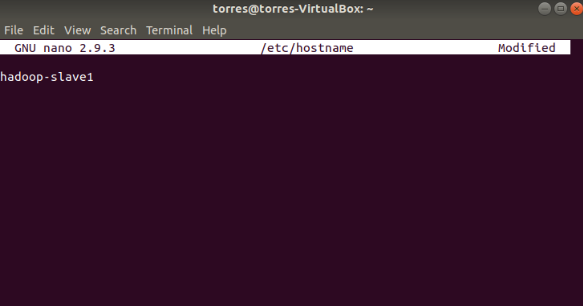
Now do the same on the slaves:
Also, you should reboot all of them so this configuration taked effect:
sudo reboot
21st Step:
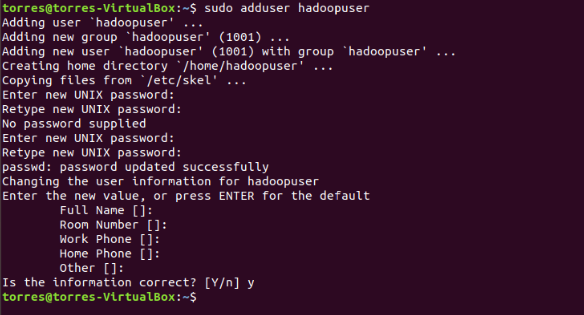
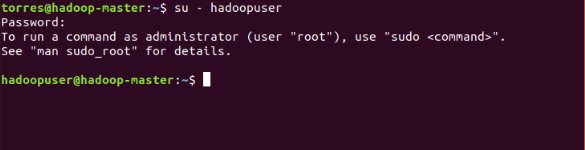
Configure the SSH on hadoop-master, with the hadoopuser. This is the command:
su - hadoopuser
22nd Step
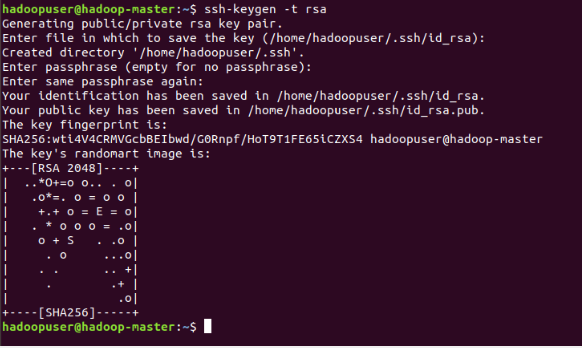
Create an SSH key:
ssh-keygen -t rsa
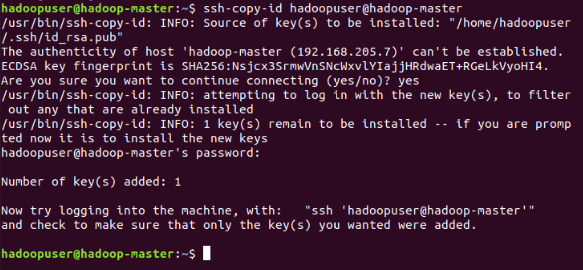
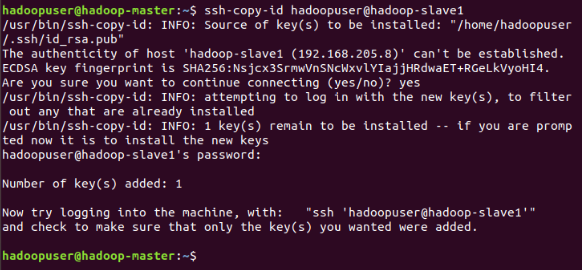
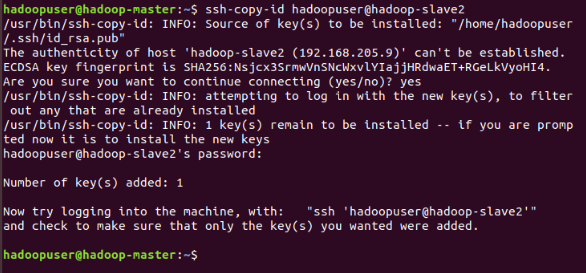
23rd Step:
Now we need to copy the SSH key to all the users. Use this command:
Just kidding, there are no more steps. Hopefully you managed to do it all correctly, and if so, congratulations on building a Hadoop Multi-Node Cluster!
Manual installation of Cloudera Manager without Google’s Dataproc functionality
Creating a cluster with 4 nodes on GCP
Once you create a Google Cloud account. Navigate to the console and hit the drop-down for “Select a project”
Now on the top-right, hit “NEW PROJECT”. Add a “project name” and click save. Leave “organization” as-is
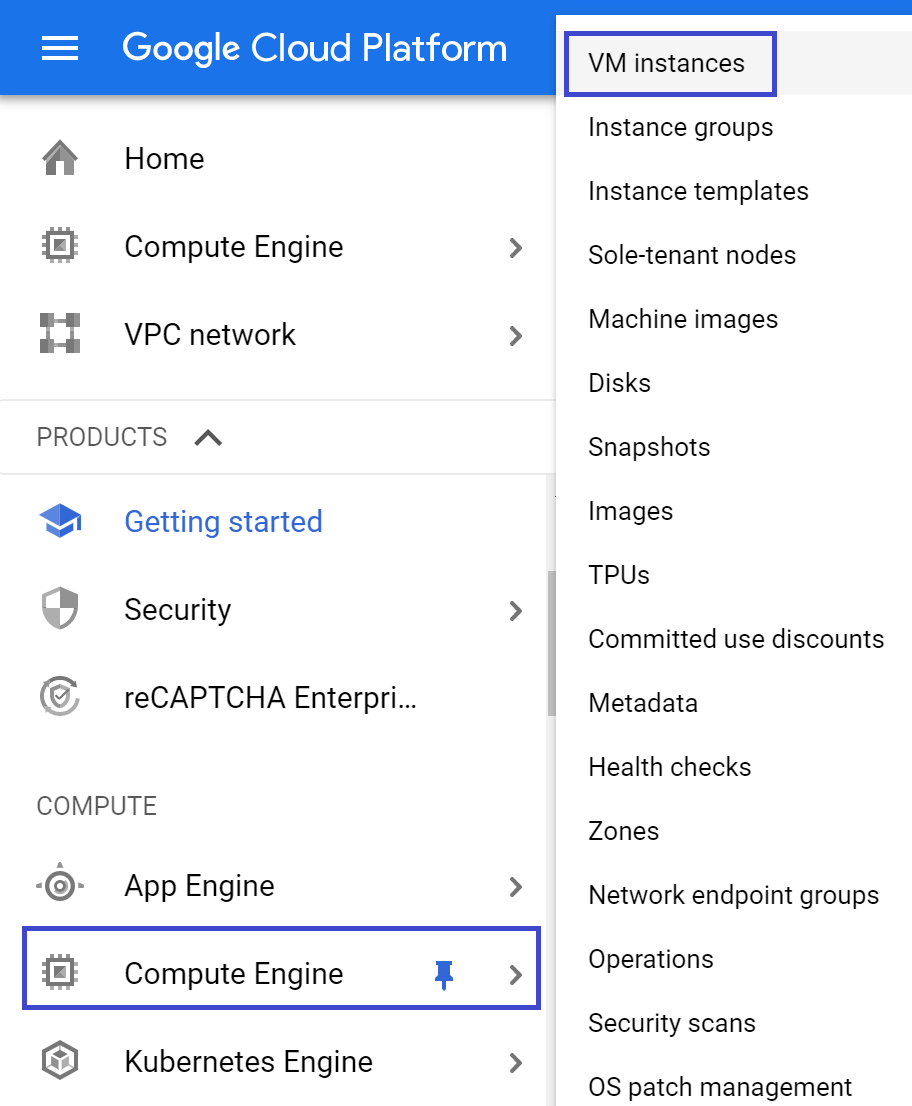
From the navigation menu on the left, select Compute Engine -> VM Instances as shown
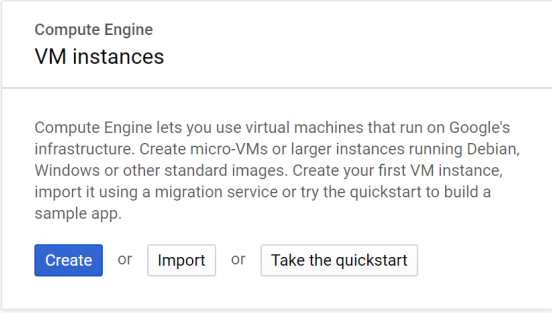
“Create” a new VM Instance
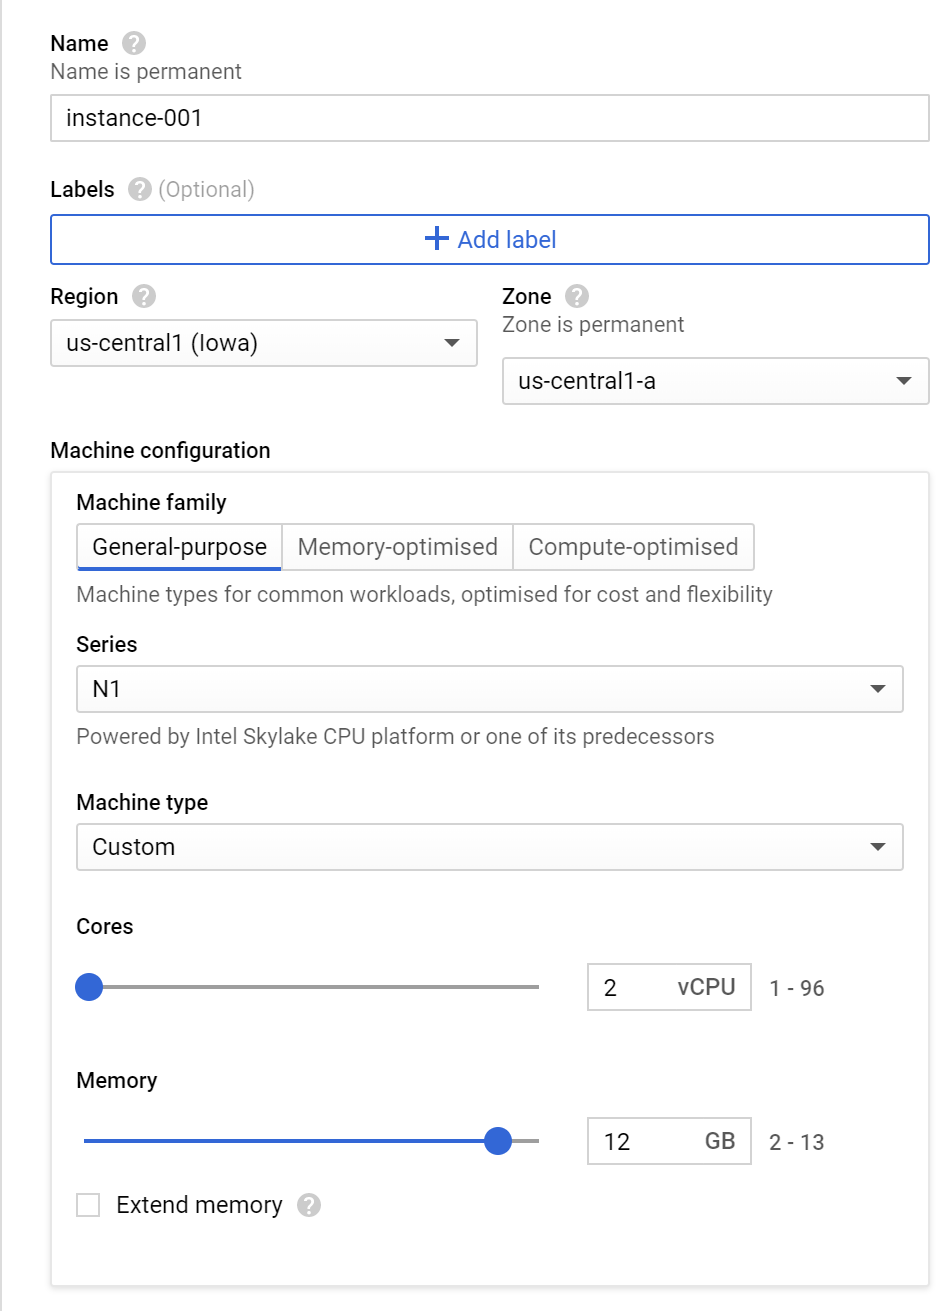
Add a generic name for the instance. I generally do instance-1 or instance-001 and continue the numbers consecutively
Select “us-central1 (Iowa)” region with the “us-central1-a” zone. This seems to be the cheapest option available
The “n1” series of general-purpose machine type is the cheapest option
Under machine type, select “Custom” with 2 cores of vCPU and 12 GB of RAM. Please note there is a limit to the number of cores and total RAMs provided under the free-tier usage policy
Under “Boot disk”, select Centos OS 7 as the OS and 100 GB as storage
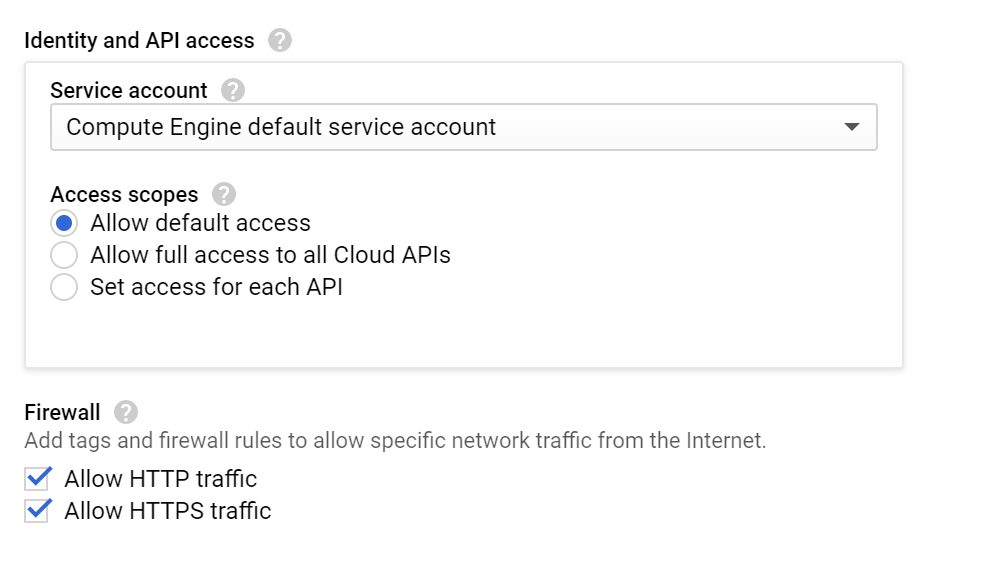
Under Identity and API access, leave the access scopes as-is
Under Firewall, select both boxes to enable HTTP and HTTPS traffic
Repeat the steps above to create 4 nodes each with the same configuration
In SSH drop-down, select “open in browser window”. Repeat for all nodes. Enter the commands:
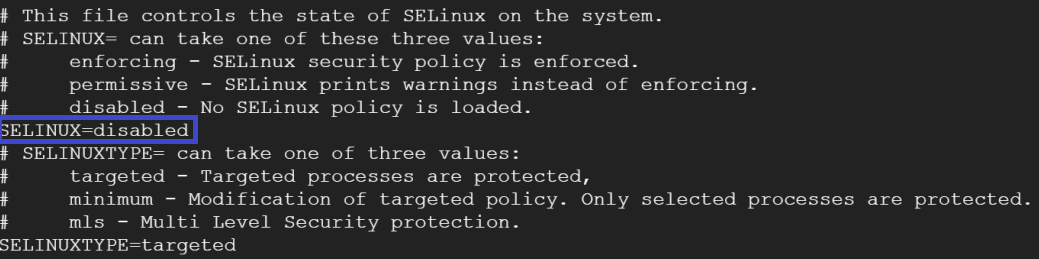
sudo su -
vi /etc/selinux/config
Inside the config file, change SELINUX=disabled
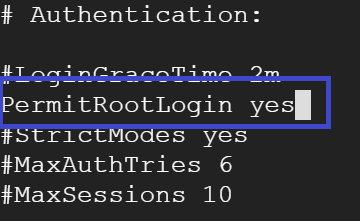
vi /etc/ssh/sshd_config
Under Authentication, change
PermitRootLogin yes
Now we can login into instance-2/3/4 from instance-1 without password
Ensure that you’ve done the above steps on all nodes. Following which you should reboot all the 4 nodes
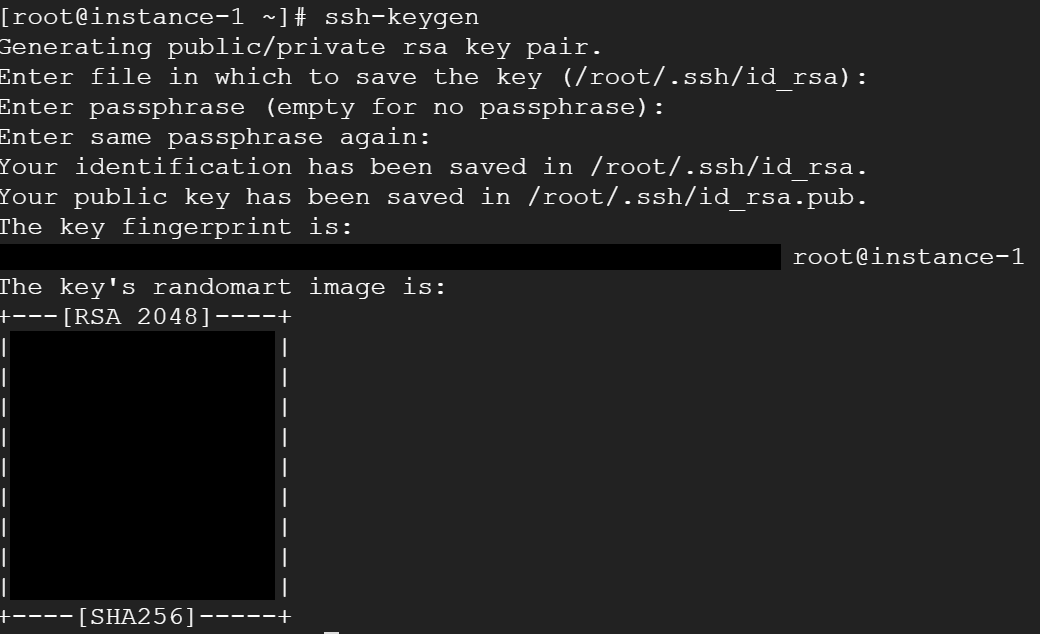
Re-login into instance-1 as root user and enter:
ssh-keygen
hit enter three times
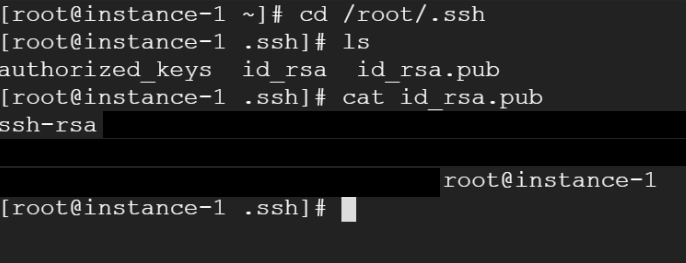
and your keys will be generated under /root/.ssh/
In instance-1, as root user:
cd /root/.ssh
cat id_rsa.pub
And copy the public key
In cloud console menu, metadata -> sshkeys -> edit -> add item -> enter key and save
Now, in the terminal, on all nodes:
service sshd restart
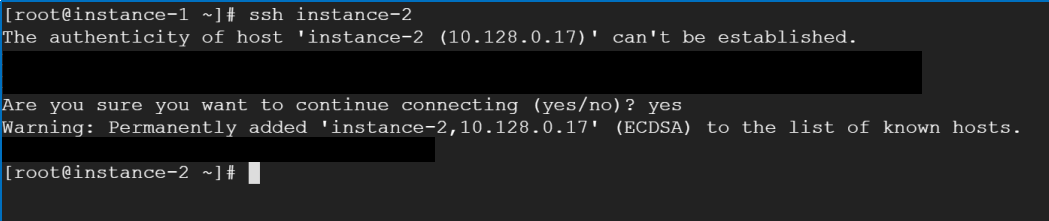
From instance-1:
ssh instance-2
“yes” to establish connection
Repeat for instance-3 and 4
Cluster setup is completed for 4 nodes on Google Cloud Platform
Installing JAVA
In order to install Java, please visit this link. The above link will allow you to download and install Java on instance-1
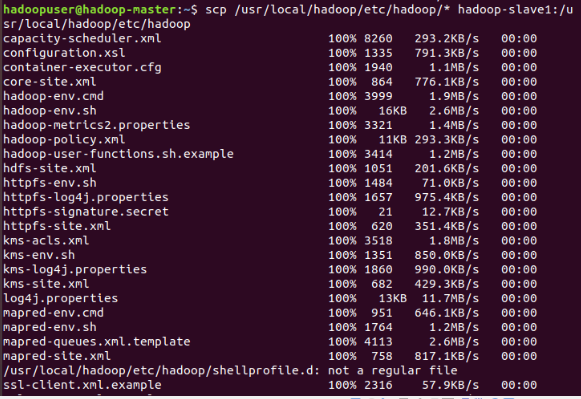
Lets install it on the other nodes now:
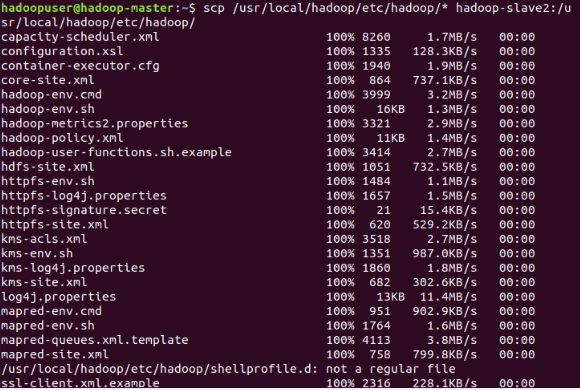
Copying the jdk…rpm to the other nodes
scp jdk….rpm instance-2:/tmp
scp jdk….rpm instance-3:/tmp
scp jdk….rpm instance-4:/tmp
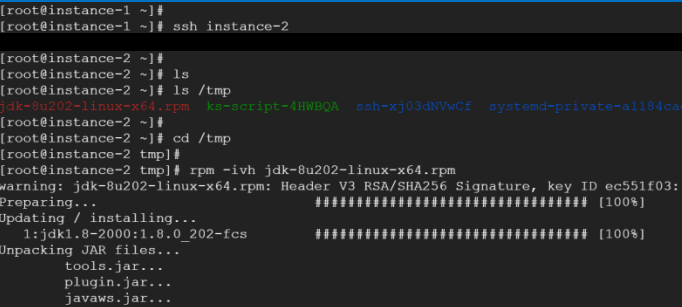
Lets navigate to instance-2 and run the following commands:
ssh instance-2
cd /tmp
rpm -ivh jdk….rpm
Repeat the same steps on instance-3/4
Java is installed on all 4 nodes on Google Cloud Platform
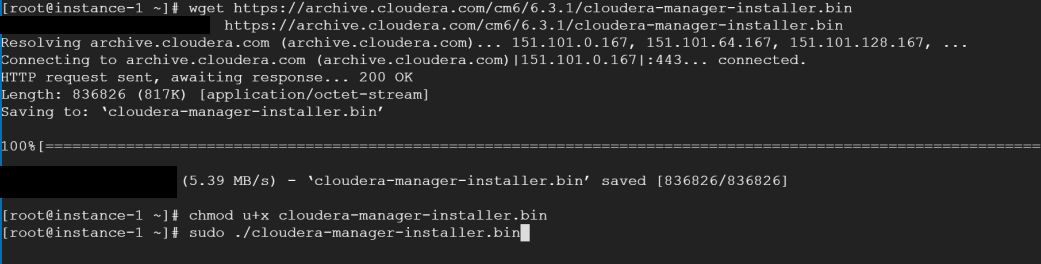
To install CM, change permissions and run the installer.bin
wget <and paste it here>
chmod u+x cloudera-manager-installer.bin
sudo ./cloudera-manager-installer.bin
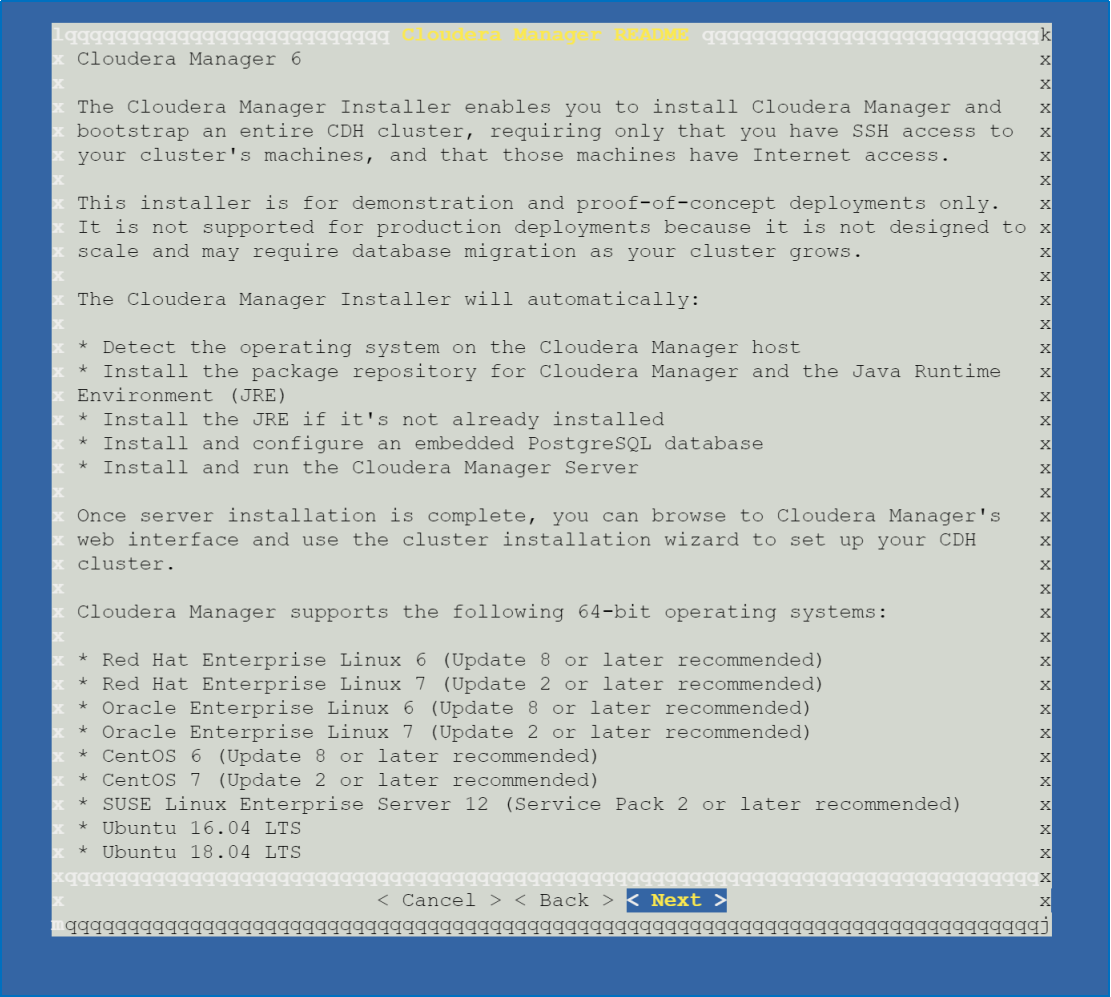
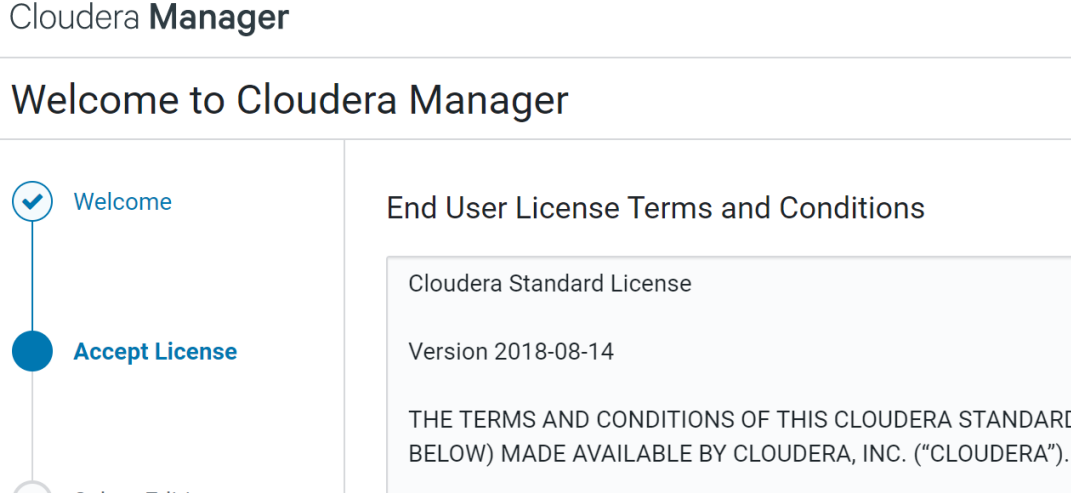
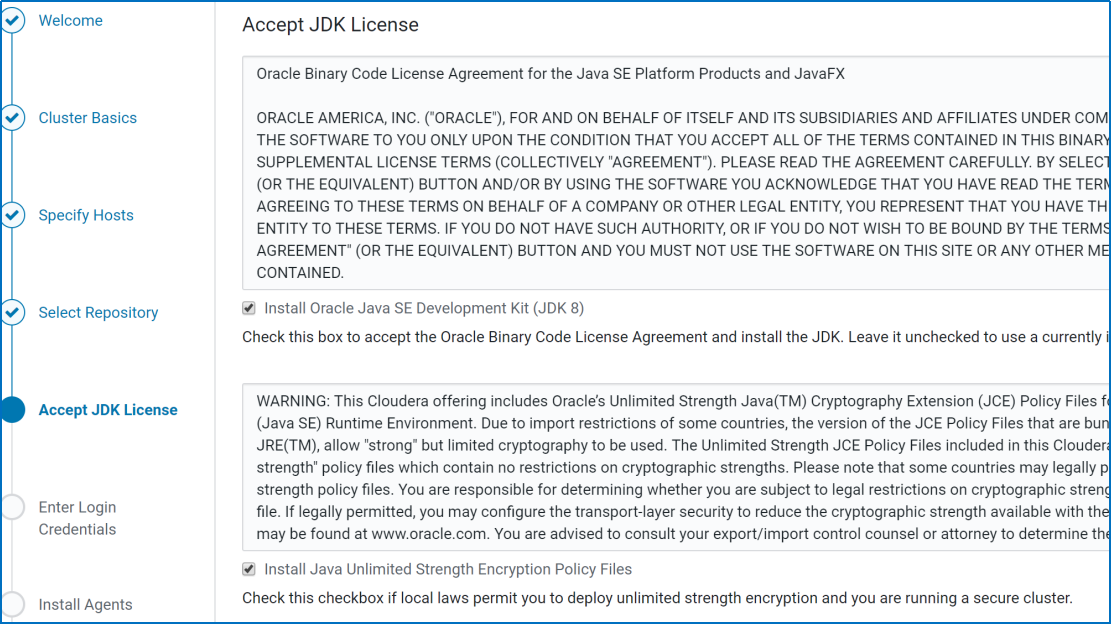
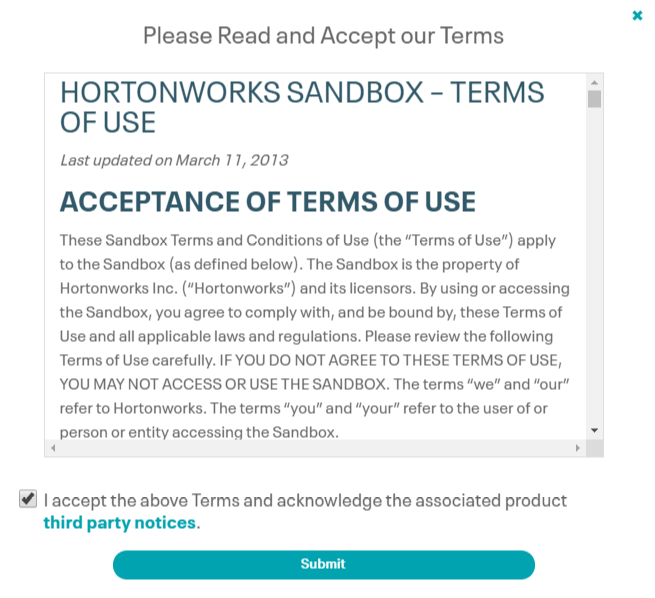
This window will now open, hit Next and accept all licenses
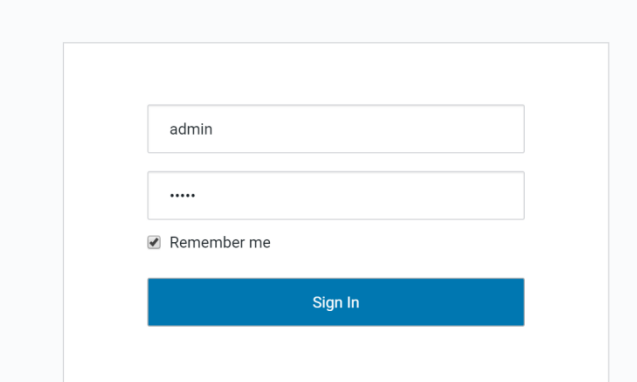
This launches the Cloudera Manager Login Page. Use admin/admin as credentials
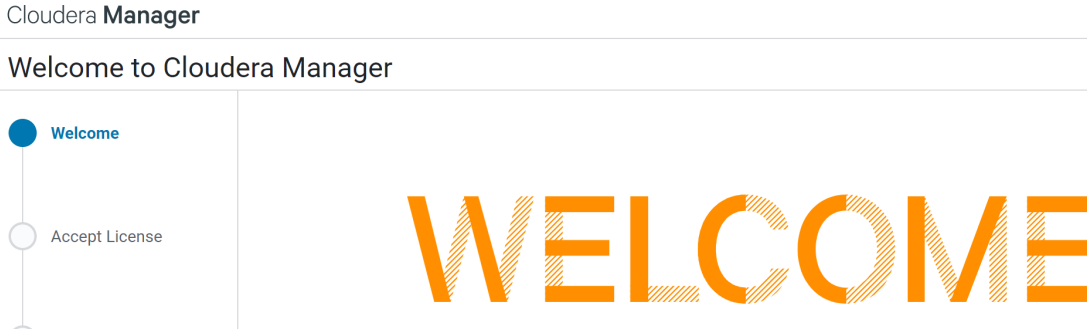
Here’s the Cloudera Manager Homepage
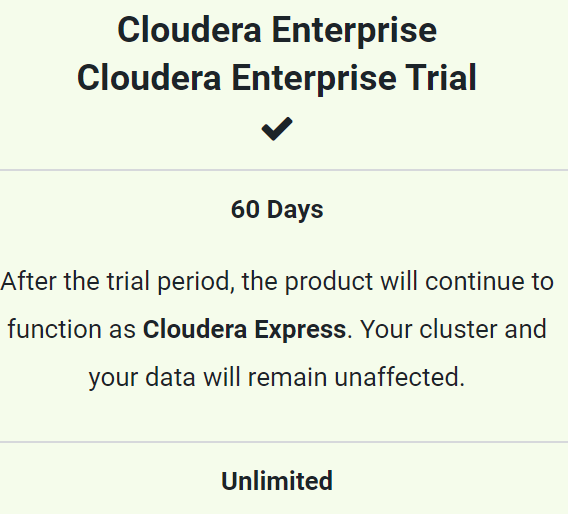
Accept the licenses
There are other options, but this 60 day Enterprise-trial period seems to be the best option.
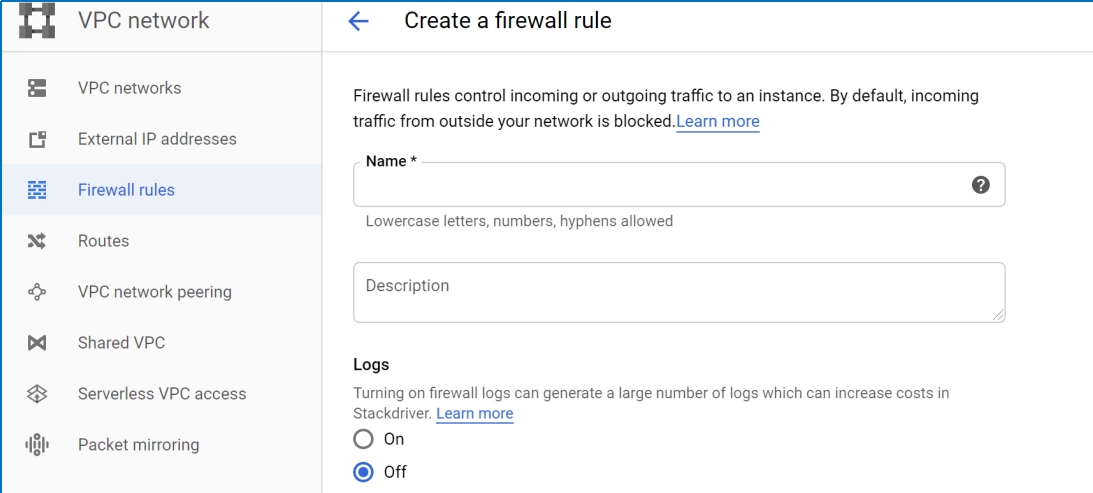
Firewall Configurations
Under VPC Network, hit Firewall rules
Click new to create a firewall rule and add a generic name
Ensure the logs are turned off
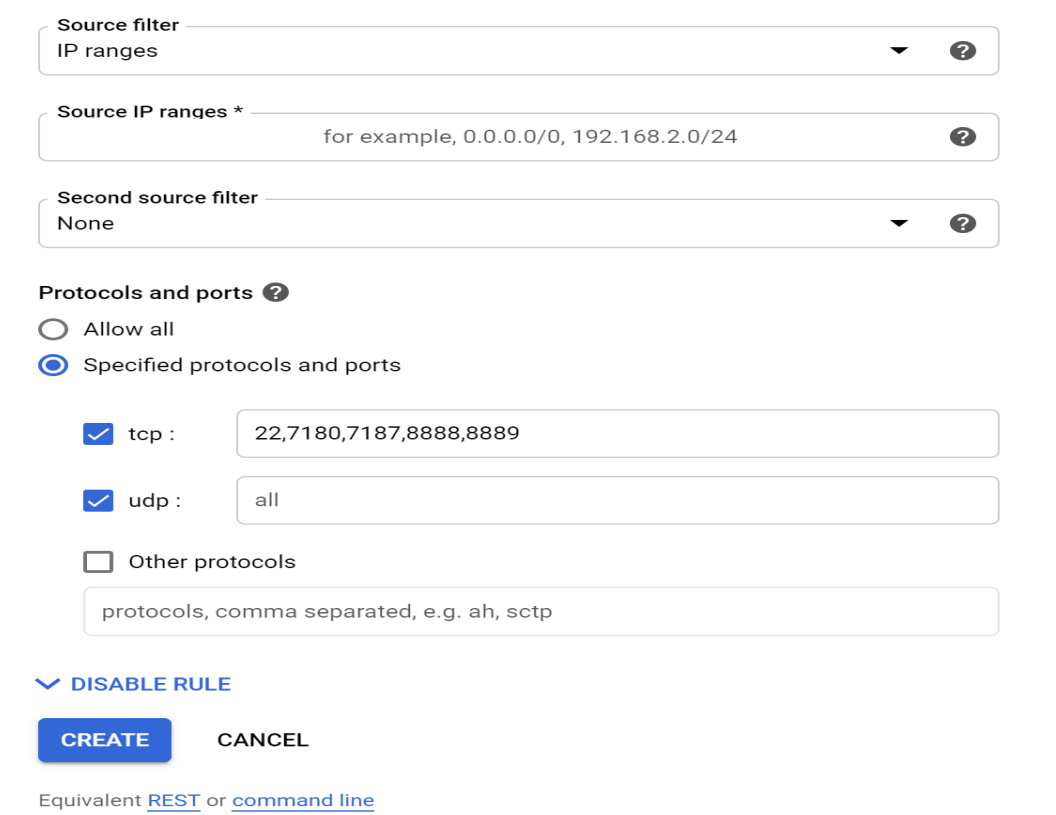
Selecting Ingress traffic, ensure to pick “All instances in the network”
Ensure tcp and udp is checked and the appropriate ports are selected: 22,7180,7187,8888,8889
Hit create
Cloudera Manager — Cluster Installation
Lets do the cluster installation now
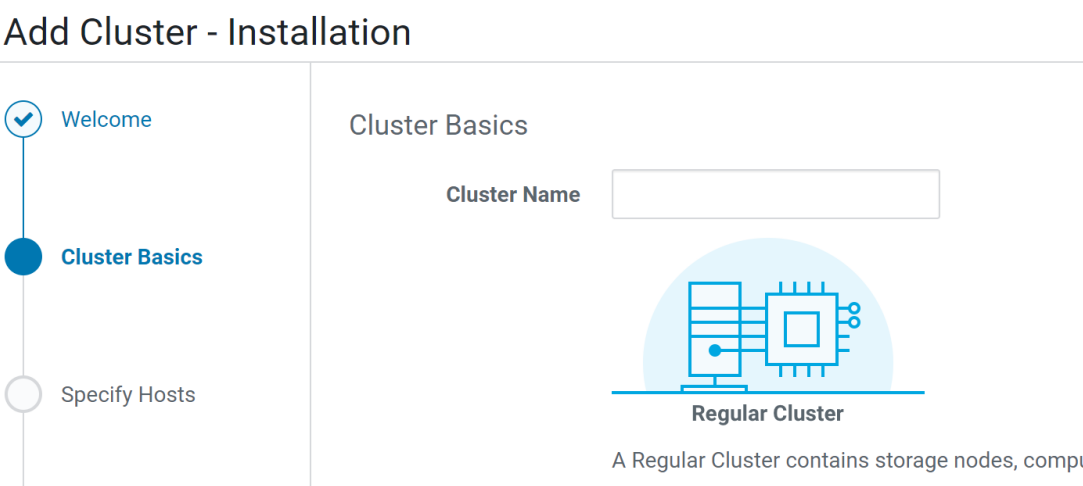
Adding a generic name
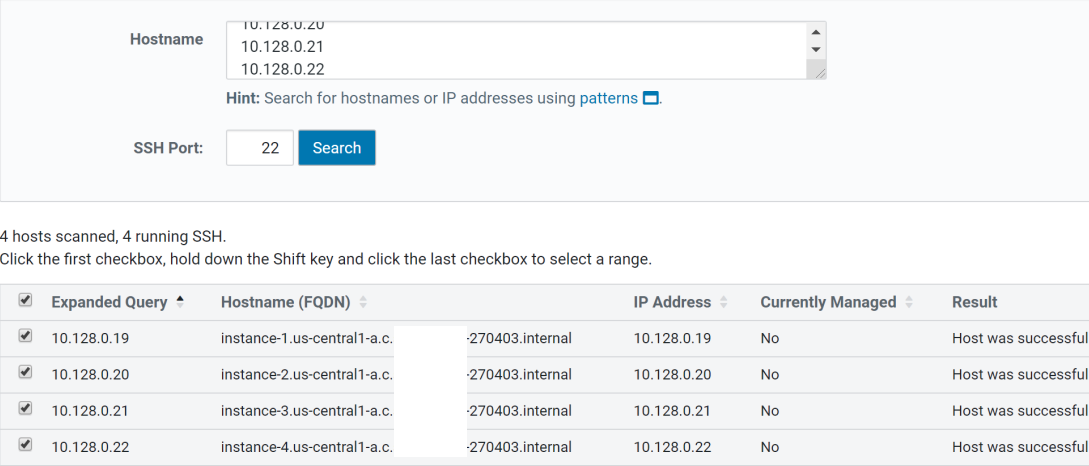
Add the internal IP addresses of the 4 nodes here and search
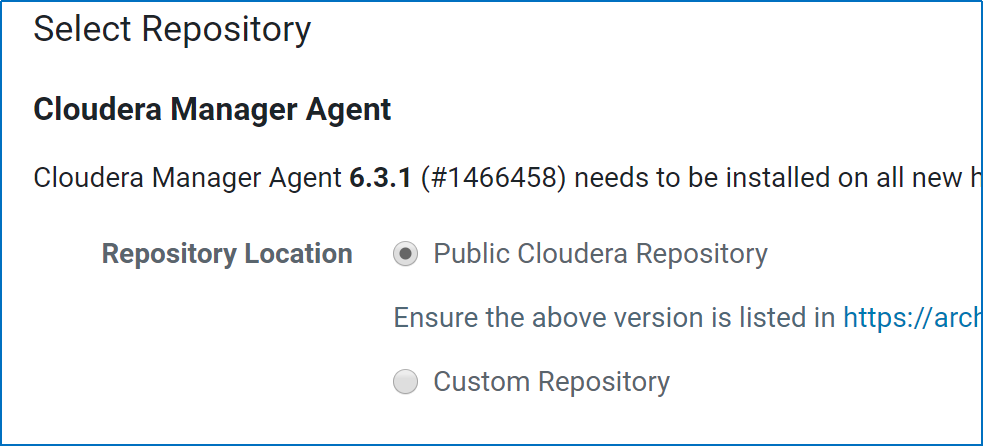
We’re selecting a public repository
Parcels method chosen for installation
Using the latest CDH version, rest all configs on this page to be left as-is
Accepting the JDK license
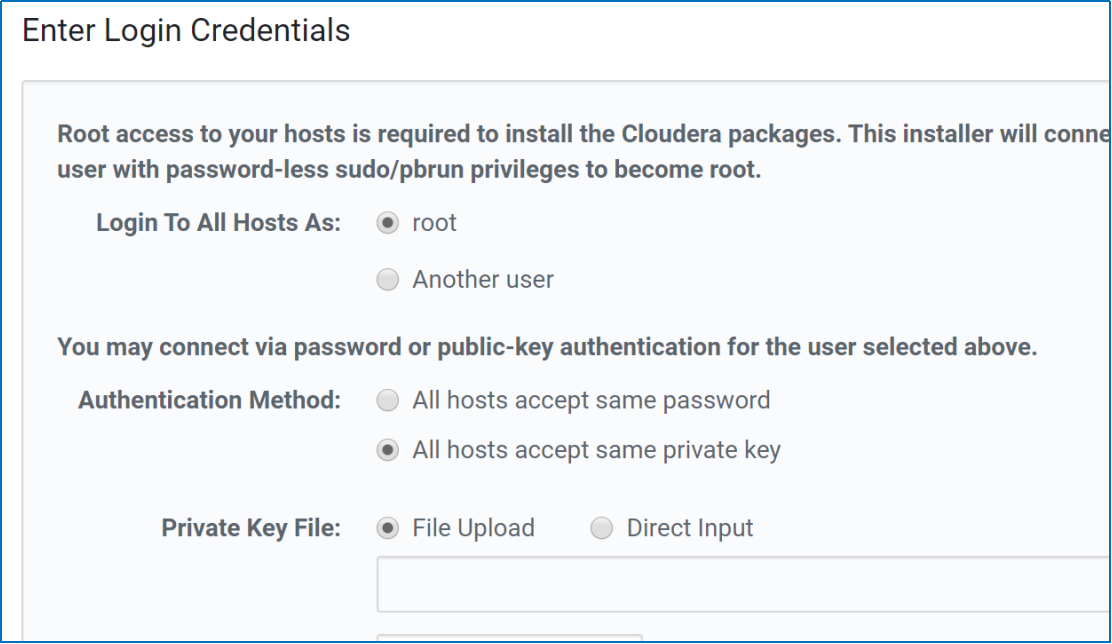
We’re using the root login through password-less communication. To authenticate we will now use the private key from the ssh-keygen we did earlier
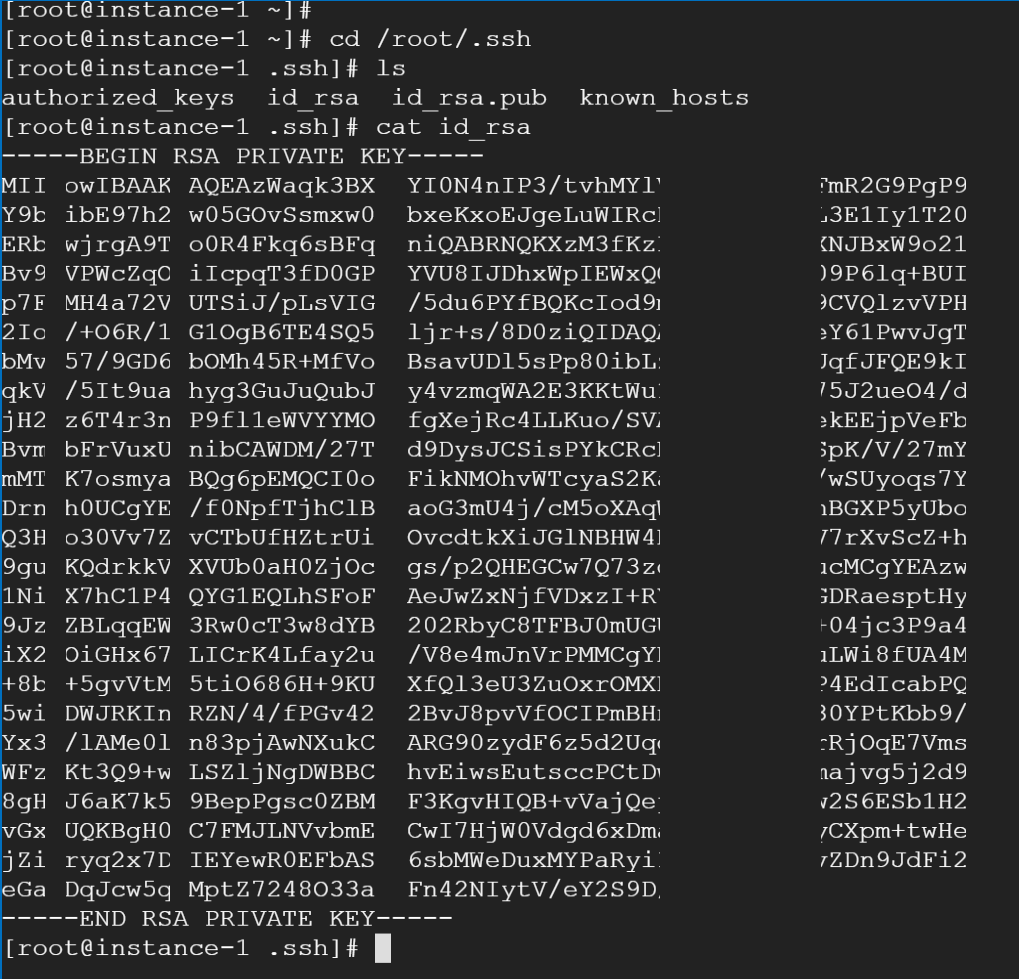
Using root login instance-1
cd /root/.ssh
cat id_rsa
Saving the private key to a file and uploading it in the cluster installation’s current step i.e. “Private Key File”
Install Parcels, this takes a while
This concludes the Cloudera Manager — Cluster Installation
Cloudera Manager — Cluster Configuration
Essential Services chosen
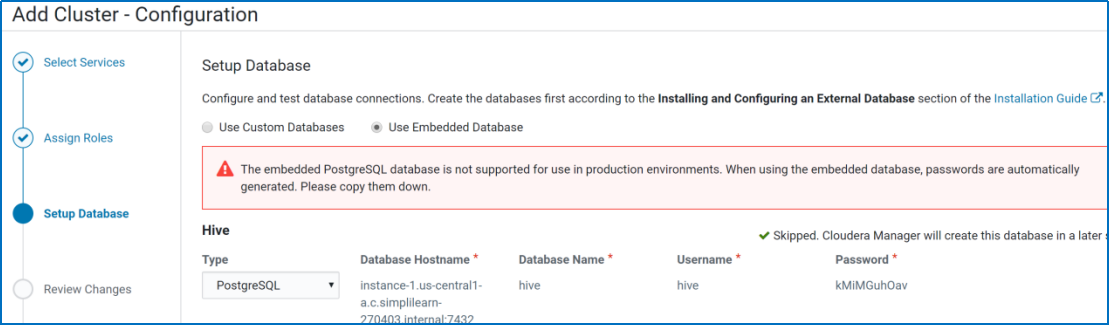
PostgreSQL embedded database chosen as default. Please note this embedded PostgreSQL is not supported for use in production environments.
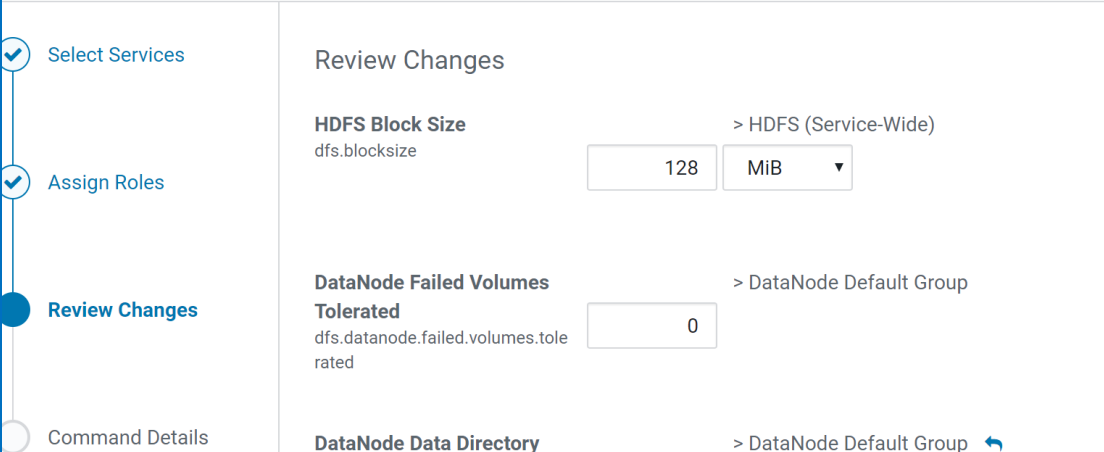
No changes at this step — Review Changes
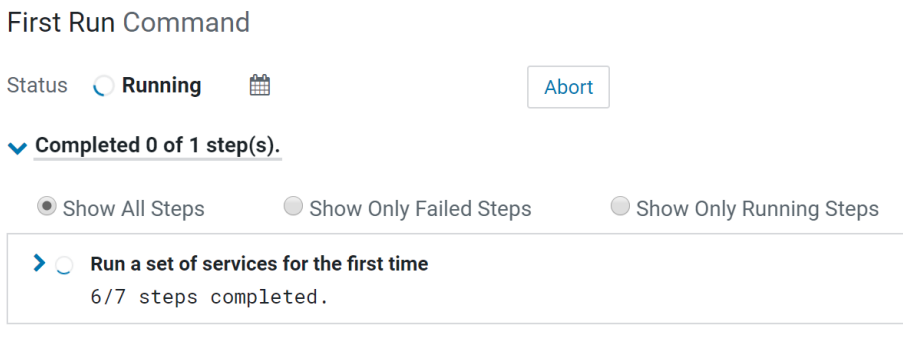
First Run Command on the services selected
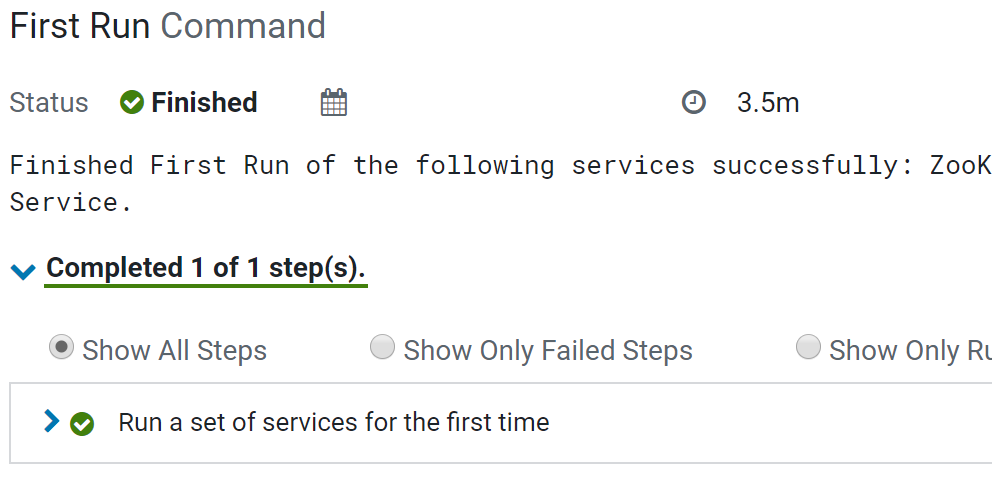
Services are up and running
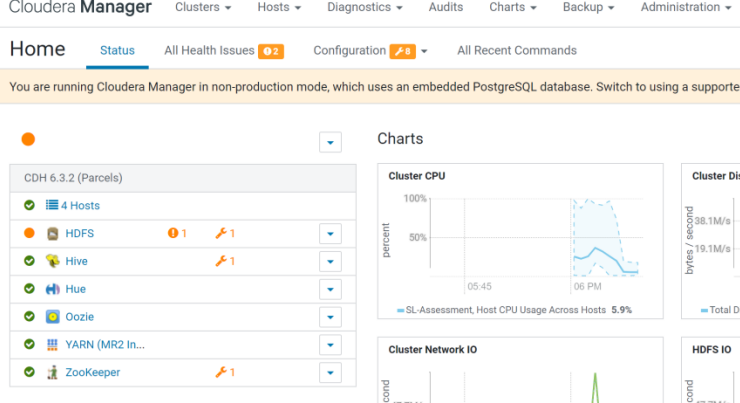
The cluster is up and running and the configuration is completed. Some minor configuration warnings are present, however, they can be safely ignored for the purpose of this assessment.
This concludes the Cloudera Manager — Cluster Configuration
Congratulations! This concludes Cloudera Manager installation on Google Cloud Platform
Hive is a data warehouse infrastructure tool to process structured data in Hadoop. It resides on top of Hadoop to summarize Big Data, and makes querying and analyzing easy.
Initially Hive was developed by Facebook, later the Apache Software Foundation took it up and developed it further as an open source under the name Apache Hive. It is used by different companies. For example, Amazon uses it in Amazon Elastic MapReduce.
Hive is not
A relational database
A design for OnLine Transaction Processing (OLTP)
A language for real-time queries and row-level updates
Features of Hive
It stores schema in a database and processed data into HDFS.
It is designed for OLAP.
It provides SQL type language for querying called HiveQL or HQL.
It is familiar, fast, scalable, and extensible.
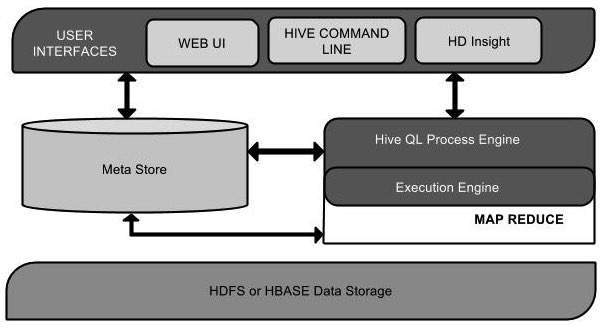
Architecture of Hive
The following component diagram depicts the architecture of Hive:
This component diagram contains different units. The following table describes each unit:
Unit Name
Operation
User Interface
Hive is a data warehouse infrastructure software that can create interaction between user and HDFS. The user interfaces that Hive supports are Hive Web UI, Hive command line, and Hive HD Insight (In Windows server).
Meta Store
Hive chooses respective database servers to store the schema or Metadata of tables, databases, columns in a table, their data types, and HDFS mapping.
HiveQL Process Engine
HiveQL is similar to SQL for querying on schema info on the Metastore. It is one of the replacements of traditional approach for MapReduce program. Instead of writing MapReduce program in Java, we can write a query for MapReduce job and process it.
Execution Engine
The conjunction part of HiveQL process Engine and MapReduce is Hive Execution Engine. Execution engine processes the query and generates results as same as MapReduce results. It uses the flavor of MapReduce.
HDFS or HBASE
Hadoop distributed file system or HBASE are the data storage techniques to store data into file system.
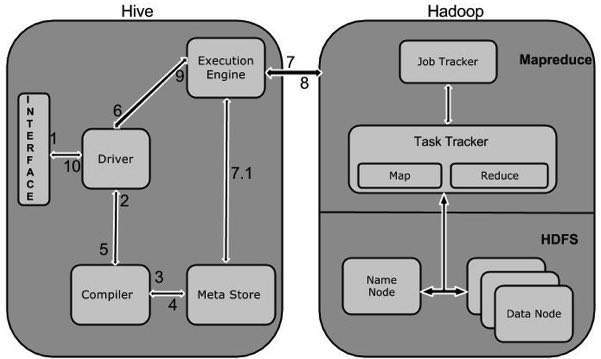
Working of Hive
The following diagram depicts the workflow between Hive and Hadoop.
Hive data types are categorized in numeric types, string types, misc types, and complex types. A list of Hive data types is given below.
Integer Types
Type
Size
Range
TINYINT
1-byte signed integer
-128 to 127
SMALLINT
2-byte signed integer
32,768 to 32,767
INT
4-byte signed integer
2,147,483,648 to 2,147,483,647
BIGINT
8-byte signed integer
-9,223,372,036,854,775,808 to 9,223,372,036,854,775,807
Decimal Type
Type
Size
Range
FLOAT
4-byte
Single precision floating point number
DOUBLE
8-byte
Double precision floating point number
Date/Time Types
TIMESTAMP
It supports traditional UNIX timestamp with optional nanosecond precision.
As Integer numeric type, it is interpreted as UNIX timestamp in seconds.
As Floating point numeric type, it is interpreted as UNIX timestamp in seconds with decimal precision.
As string, it follows java.sql.Timestamp format “YYYY-MM-DD HH:MM:SS.fffffffff” (9 decimal place precision)
DATES
The Date value is used to specify a particular year, month and day, in the form YYYY–MM–DD. However, it didn’t provide the time of the day. The range of Date type lies between 0000–01–01 to 9999–12–31.
String Types
STRING
The string is a sequence of characters. It values can be enclosed within single quotes (‘) or double quotes (“).
Varchar
The varchar is a variable length type whose range lies between 1 and 65535, which specifies that the maximum number of characters allowed in the character string.
CHAR
The char is a fixed-length type whose maximum length is fixed at 255.
Complex Type
Type
Size
Range
Struct
It is similar to C struct or an object where fields are accessed using the “dot” notation.
struct(‘James’,’Roy’)
Map
It contains the key-value tuples where the fields are accessed using array notation.
map(‘first’,’James’,’last’,’Roy’)
Array
It is a collection of similar type of values that indexable using zero-based integers.